Navigating lengthy Microsoft Word documents can be cumbersome. Whether it’s a multi-page assignment or a complex contract, keeping track of information can be a challenge. A table of contents provides a structured overview, enhances navigation, and adds a professional touch to your document. This guide provides a detailed walkthrough of creating, updating, customizing, and even manually building a table of contents in Microsoft Word.
Adding a table of contents might seem daunting, but it’s surprisingly straightforward. While Word offers a quick, automated method, understanding the nuances of different approaches allows for greater control and customization. Before starting, ensure your document has page numbers, which are essential for a functional table of contents.
The Quick Method for Creating a Table of Contents
The fastest way to generate a table of contents is through Word’s built-in feature. Simply navigate to the “References” tab, select “Table of Contents,” and choose a pre-designed style. Word will automatically create a table of contents based on the existing document structure. However, this method might not always yield the desired results, especially for complex documents.
Preparing Headings for an Automatic Table of Contents
For a more robust and accurate table of contents, utilizing heading styles is crucial. This allows Word to identify the hierarchical structure of your document.
-
Apply Heading Styles: Go through your document and apply heading styles (“Heading 1,” “Heading 2,” “Heading 3,” etc.) to your section titles. These styles, found under the “Home” tab in the “Styles” group, dictate the hierarchy within your table of contents. “Heading 1” represents the highest level, followed by “Heading 2,” “Heading 3,” and so on.
-
Insert the Table of Contents: Place your cursor where you want the table of contents to appear (usually the beginning of the document). Navigate to the “References” tab and click the “Table of Contents” button.
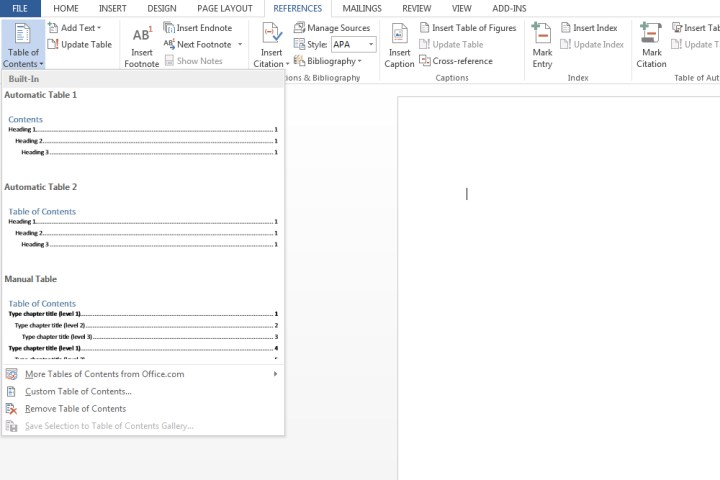 The Table of Contents button in Microsoft Word. Image courtesy of MaagX
- Choose an Automatic Table Style: Select either “Automatic Table 1” or “Automatic Table 2.” The primary difference lies in the default titles used for the table of contents itself.
Word will now generate a table of contents based on the applied heading styles, including the corresponding page numbers. Using different heading levels creates a tiered, organized structure within the table.
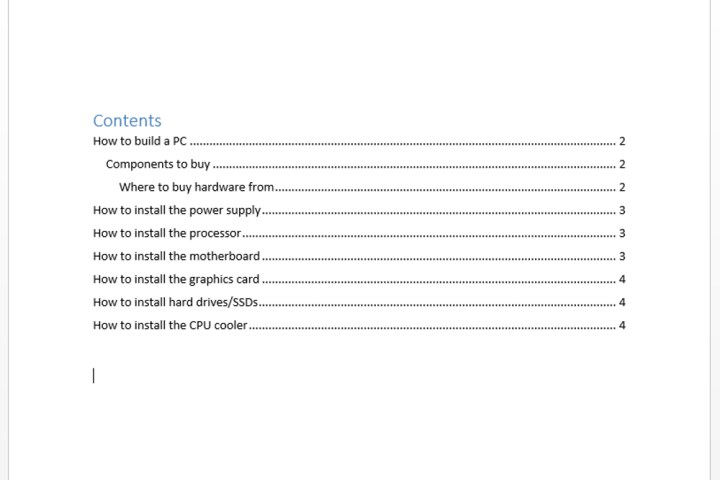 A Table of Contents in Microsoft Word. Image courtesy of MaagX
Updating Your Table of Contents
Maintaining an accurate table of contents requires updating it whenever changes are made to the document.
-
Select the Table of Contents: Click anywhere within the table of contents.
-
Update the Table: Go to the “References” tab and click “Update Table.”
-
Choose an Update Method: Select “Update page numbers only” to refresh page numbers without altering heading text, or “Update entire table” to reflect changes to both headings and page numbers.
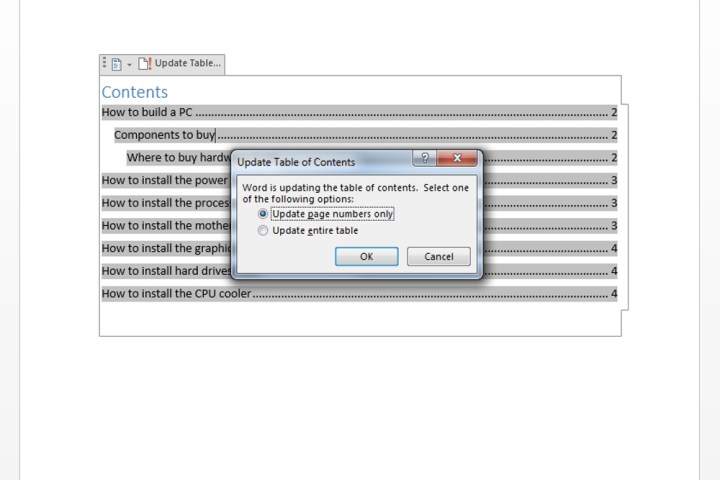 Updating a Table of Contents. Image courtesy of MaagX
Customizing the Table of Contents
Word offers customization options to tailor the appearance of your table of contents.
- Access Customization Options: Click within the table of contents, go to the “References” tab, select “Table of Contents,” and then click “Custom Table of Contents.”
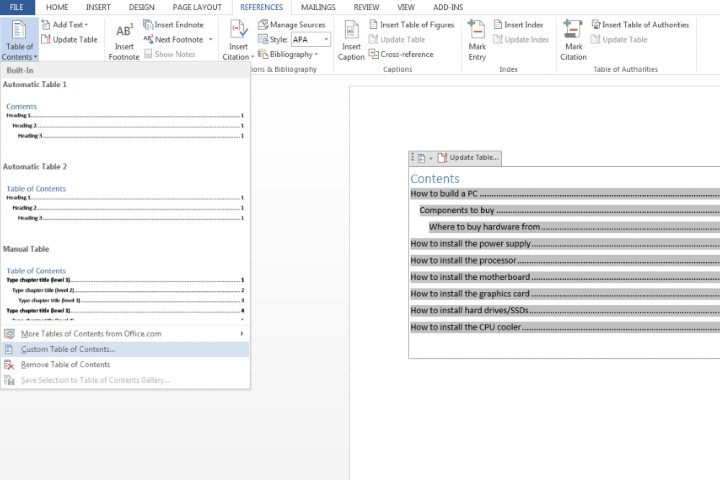 Custom Table of Contents button. Image courtesy of MaagX
- Modify Settings: In the “Table of Contents” dialog box, adjust settings such as the number of heading levels to display, page number formatting, and alignment. The “Options” button provides further customization possibilities.
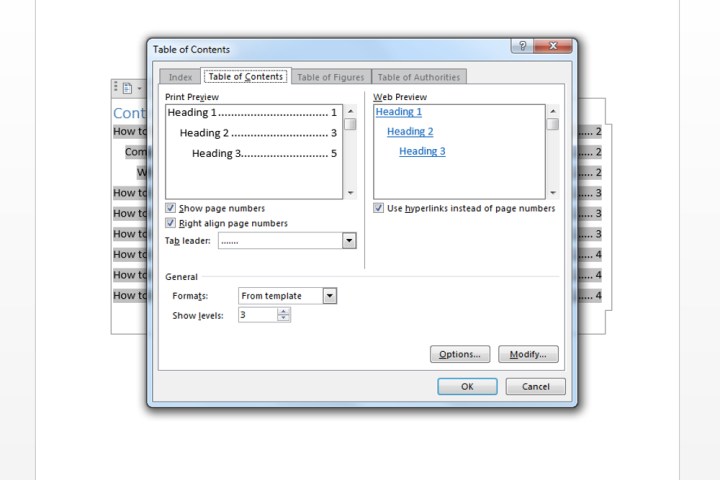 Custom Table of Contents window. Image courtesy of MaagX
- Format Text: To change the font, size, color, or other text attributes, highlight the desired text within the table of contents and use the formatting tools in the “Home” tab.
Manually Creating a Table of Contents
For documents with unconventional formatting or specific requirements, a manual table of contents might be necessary.
-
Insert a Manual Table: Go to “References,” select “Table of Contents,” and choose “Manual Table.”
-
Input Information: Manually enter all the entries and corresponding page numbers. Note that manual tables do not update automatically and require manual edits for any changes.
-
Customize the Manual Table: Similar to automatic tables, you can customize the appearance of a manual table of contents through the “Custom Table of Contents” option in the “References” tab.
Removing a Table of Contents
To delete a table of contents, click anywhere within the table, go to the “References” tab, select “Table of Contents,” and choose “Remove Table of Contents.”
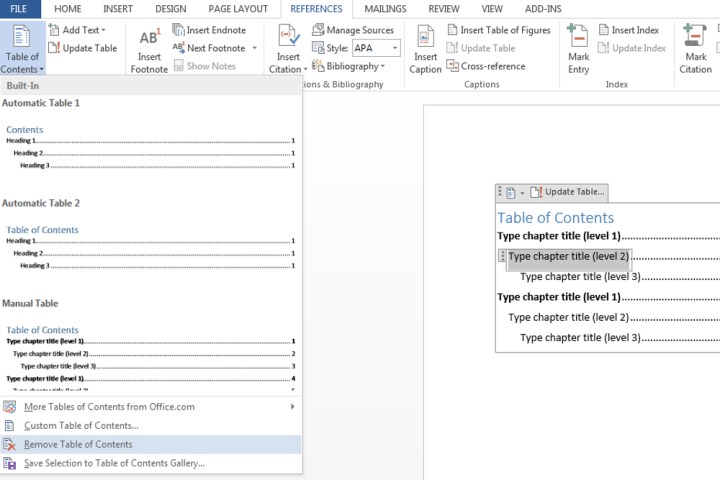 Removing a Table of Contents. Image courtesy of MaagX
Conclusion
Mastering the creation and management of tables of contents is a valuable skill for anyone working with Microsoft Word. Whether using the quick method, leveraging heading styles for automated generation, or opting for manual control, this comprehensive guide provides the tools to create professional, navigable documents. From simple reports to complex publications, a well-structured table of contents enhances readability and organization.


