Adding footnotes to your Word documents is crucial for citing sources and providing supplementary information without disrupting the flow of your main text. This guide offers a step-by-step approach to inserting and managing footnotes efficiently in various Word versions, from Microsoft 365 to Word 2007.
Understanding Footnotes in Word
Footnotes serve as valuable annotations within a document. They allow you to cite sources accurately, offer additional commentary, or provide clarifying details without interrupting the main narrative. Microsoft Word simplifies footnote management with an automated formatting feature, ensuring a polished and professional look.
Inserting Footnotes: A Step-by-Step Guide
This method works across multiple Word versions, including Word for Microsoft 365, Word 2021, Word 2019, Word 2016, Word 2013, Word 2010, and Word 2007. The screenshots below are from Word for Microsoft 365.
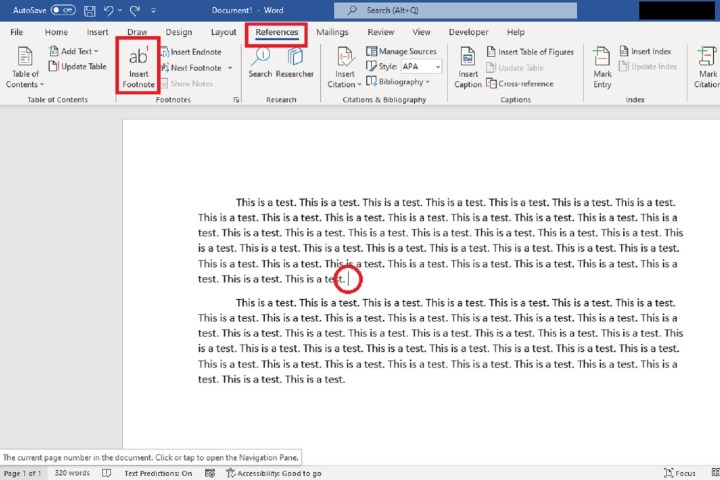
Step 1: Positioning the Cursor: Click on the precise location in your document where you want the footnote to appear.
Step 2: Accessing the References Tab: Navigate to the ribbon menu at the top of the screen and select the References tab.
 Accessing the References tab in Microsoft Word.
Step 3: Inserting the Footnote: Click the Insert Footnote button.
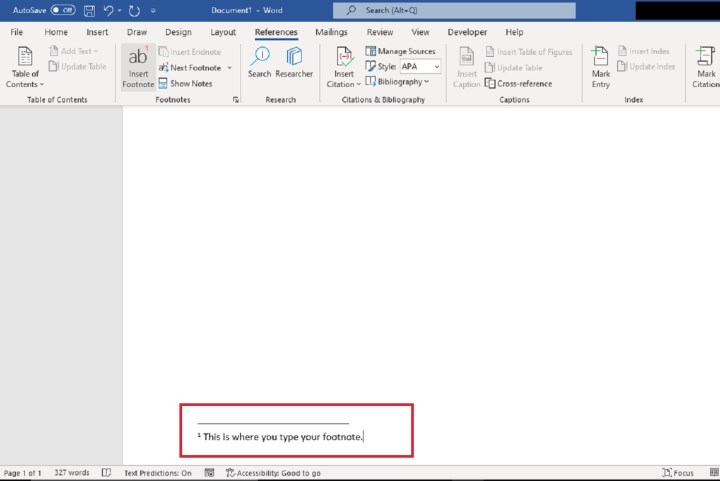
Step 4: Entering Footnote Text: Word automatically takes you to the bottom of the page, providing a designated space for your footnote text. Type your footnote content here.
 Typing footnote text in the designated area.
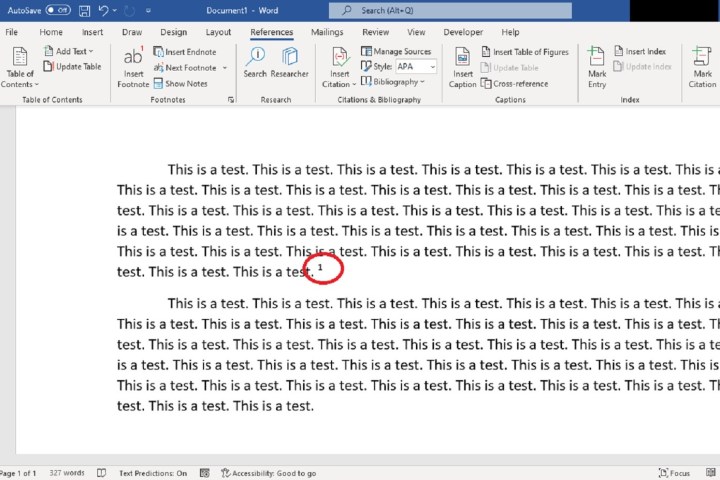
Step 5: Returning to the Main Text: Double-click the small superscript number preceding your newly created footnote. This action seamlessly returns you to your original position in the document.
Your footnote will appear near the page numbers when you view or print the document.
 Final view of the footnote in the document.
Utilizing Keyboard Shortcuts for Footnotes
For frequent footnote usage, the following keyboard shortcut offers a faster alternative:
Step 1: Positioning the Cursor: Click where you want the footnote.
Step 2: Using the Shortcut: Press Alt + Ctrl + F.
Step 3: Entering and Returning: Type your footnote at the bottom of the page. Double-click the superscript number to return to your place in the document.
Adding Footers in Word
Footers, unlike footnotes, appear on every page. They are ideal for document titles, author names, page numbers, or other consistent information.
To add a footer:
- Go to Insert > Footer.
- Type your footer text in the provided box.
- Press Esc or click Close Header and Footer to save.
Double-click an existing footer to edit it.
Enhancing Document Navigation and Referencing
Footnotes, along with features like tables of contents and bibliographies, significantly improve document readability and navigation, particularly for longer texts. They provide a structured approach to referencing and enhance the overall user experience.
Conclusion
Mastering footnotes in Microsoft Word empowers you to create professional, well-referenced documents. Whether you’re citing sources, adding commentary, or providing supplementary information, footnotes offer a streamlined solution for enhancing clarity and readability. Utilize these techniques to elevate your document organization and referencing practices.


