Hiding folders in Windows 11 offers a simple way to shield personal or sensitive information from casual view. While not foolproof, it adds a layer of privacy by preventing the folder from appearing in typical file searches and directory listings. This guide will walk you through the process of hiding and unhiding folders in Windows 11, empowering you to manage your data privacy effectively.
 Hiding a folder in Windows.
Accessing folder properties in Windows 11 to initiate the hiding process.
Hiding Your Folders: A Simple Process
These steps outline the folder hiding procedure in Windows 11. While the interface may differ slightly, the process is largely similar for Windows 10 users.
Step 1: Accessing Folder Properties
Locate the folder you wish to hide. Right-click on it (or tap and hold on touchscreen devices), then select “Properties” from the context menu.
Step 2: Marking the Folder as Hidden
In the Properties window, locate the “Attributes” section. Check the box next to “Hidden” and click “Apply.”
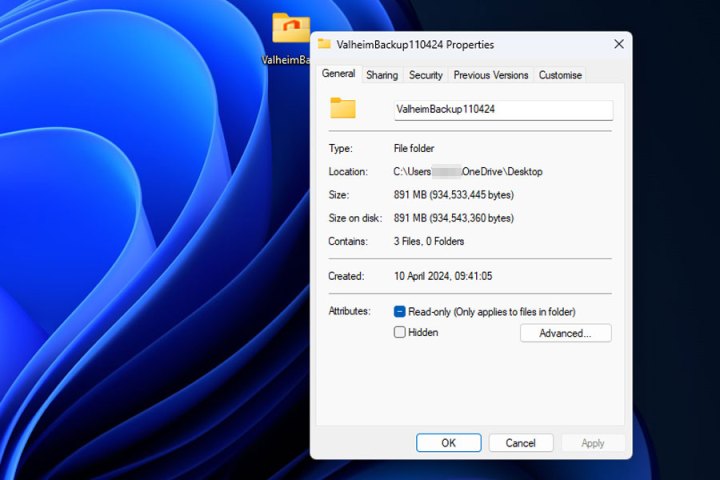 Hiding a folder in Windows.
Activating the “Hidden” attribute within the folder’s properties.
Step 3: Applying the Change to Subfolders and Files (Optional)
A prompt will appear asking if you want to apply the “Hidden” attribute to all subfolders and files within the selected folder. Choose the appropriate option based on your needs and click “OK.”
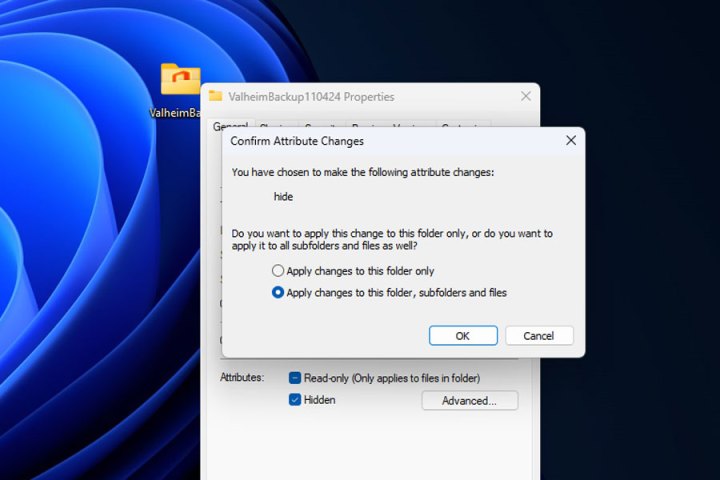 Hiding a folder in Windows.
Choosing whether to extend the “Hidden” attribute to subfolders and files.
Step 4: Verifying the Hidden Status
The folder will now be hidden from standard file explorer views and search results. However, if you have the “Show hidden files, folders, and drives” option enabled in File Explorer settings, the hidden folder will appear semi-transparent.
 Hidden folder in Windows 11.
Appearance of a hidden folder when “Show hidden files” is enabled.
Unhiding Your Folders: Reversing the Process
To unhide a folder, simply repeat the steps outlined above, but uncheck the “Hidden” attribute in the Properties window. Click “Apply” and confirm the change.
Locating Hidden Folders: Unveiling the Invisible
Even when hidden, folders can still be accessed by adjusting your File Explorer settings.
Step 1: Opening File Explorer
Open File Explorer by navigating to any folder or using the Windows search bar.
Step 2: Showing Hidden Items
In the File Explorer window, click on the “View” tab in the ribbon menu. In the “Show/hide” section, check the box next to “Hidden items.”
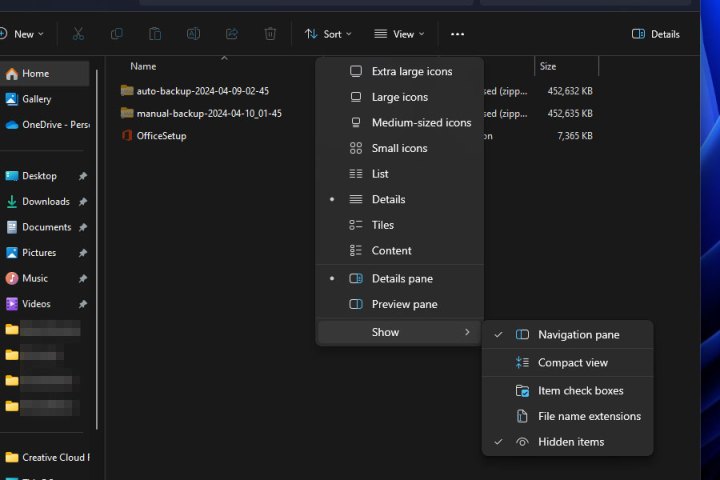 Show hidden files in Windows 11.Enabling the visibility of hidden files and folders in File Explorer.
All hidden files and folders will now be visible, appearing semi-transparent to distinguish them from regular items.
Enhancing Data Security: Beyond Hiding Folders
For more robust protection, consider additional security measures. Password-protecting individual files or folders provides stronger security against unauthorized access. Cloud storage solutions like Dropbox or Google Drive offer an off-device storage option, adding another layer of privacy.


