The Windows Recycle Bin is more than just a digital trash can; it’s a powerful tool that offers a surprising level of control over file management. While often perceived as a simple deletion mechanism, understanding its nuances can significantly enhance your PC experience. This guide delves into the Recycle Bin’s functionality, offering valuable tips and tricks to optimize your workflow and ensure data security.
The term “recycle” aptly describes its function. Similar to a physical recycle bin, files placed here aren’t immediately gone; they occupy storage space and can be restored. This crucial distinction from permanent deletion offers a safety net against accidental file removal.
Understanding the Recycle Bin’s True Function
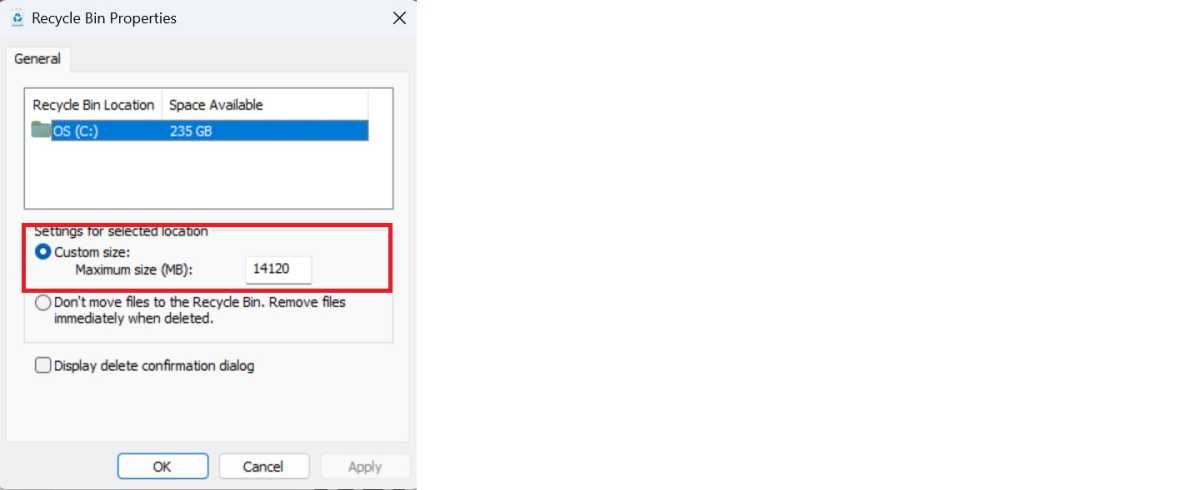 The Recycle Bin’s context menu allows customization of storage capacity and defines actions for “deleted” items. It’s important to note that “deleting” a file in Windows actually moves it to the Recycle Bin, not permanently erases it. Even the “Delete files immediately” option doesn’t truly delete the data; it simply bypasses the Recycle Bin and allows the hard drive space to be overwritten. While this makes data recovery more difficult, it doesn’t guarantee complete erasure.
The “Show dialogue to confirm deletion” setting only controls the appearance of a confirmation prompt. Data remains recoverable even if the prompt is disabled. For secure deletion, consider tools like Secure Eraser, which overwrite files multiple times after emptying the Recycle Bin.
Windows allows customized Recycle Bin settings for each partition and hard drive. Files can be deleted immediately from one drive while being moved to the Recycle Bin on another. The Shift+Del shortcut bypasses the Recycle Bin and immediately deletes files, regardless of individual drive settings. Note that external drives are handled differently: files from external USB hard drives are moved to the Recycle Bin, while files on USB sticks and network drives are deleted immediately after a confirmation prompt.
Customizing the Recycle Bin’s Appearance and Accessibility
 The Recycle Bin’s desktop icon can be hidden or its appearance customized without affecting its core functionality. Access these settings through Personalization > Themes > Desktop icon settings. You can also change the icons for the empty and full states of the Recycle Bin.
Resize desktop icons, including the Recycle Bin, by holding Ctrl and scrolling the mouse wheel. Alternatively, adjust icon size and labels through System > Screen (Windows 10) or System > Display (Windows 11), using default settings or custom scaling.
Display the Recycle Bin in Windows Explorer’s left-hand tree structure by opening the Recycle Bin, right-clicking an empty space in the tree structure, and selecting “Expand to current folder.”
To pin the Recycle Bin to the taskbar, create a shortcut on the desktop (New > Shortcut), using the location C:Windowsexplorer.exe shell:RecycleBinFolder and naming it “Recycle Bin.” Before pinning it to the taskbar, change the icon to the Recycle Bin icon located in C:WindowsSystem32imageres.dll. Drag and drop the shortcut to the taskbar; the desktop shortcut can then be deleted.
Remove unwanted entries from the Recycle Bin’s context menu by opening the registry editor (regedit), searching for 645FF040-5081-101B-9F08-00AA002F954E, and deleting the associated program entry within the “shell” subkey.
Automating Recycle Bin Cleanup and Optimizing File Restoration
While the Recycle Bin protects against accidental deletion, regular cleanup is crucial for managing storage space. Windows offers automated cleanup through Storage Sense.
 Access Storage Sense settings through System > Storage. In Windows 10, enable the slider and click “Configure storage optimization.” In Windows 11, activate “Storage Sense.” Configure automatic deletion of files older than a specified period (default is 30 days). Shortening this period improves Recycle Bin organization.
The Recycle Bin interacts with Windows Explorer like a standard directory, offering various view options (accessible through “View” in Windows 10 or “Show” in Windows 11). “Details” view allows sorting by column headers, such as “Date deleted,” for easy file retrieval. The search function supports wildcard characters like the asterisk (*) for partial file name searches.
 Restore files to their original location using the “Restore” option in the context menu. Alternatively, drag and drop files from the Recycle Bin to a new location. For recovering permanently deleted files, consider using data recovery software like Recuva. Avoid using “Restore all items” unless absolutely necessary; use Ctrl+Z to undo accidental restorations.
Securely Erasing Data: Beyond the Recycle Bin
For truly secure deletion, tools like Secure Eraser are essential. This software overwrites data multiple times, making recovery significantly more challenging. However, Secure Eraser can’t fully erase the system partition while Windows is running. For complete drive erasure, boot from an external drive using tools like Darik’s Boot and Nuke (DBAN) for HDDs, creating the bootable USB with Rufus.
For SSDs, utilize the “Secure Erase” function integrated into the drive’s firmware. This is often accessible through the BIOS/UEFI. If not available in the BIOS, boot from a Linux live system using a tool provided by the SSD manufacturer or software like PartedMagic.


