Even seemingly simple tools like Windows Explorer have hidden depths. The search function, for instance, goes far beyond simply locating files and folders. With advanced search options, you can refine results and use them for a variety of purposes. However, Windows search isn’t always the fastest, and it doesn’t always deliver the expected results. While this can be optimized, alternative search tools often offer superior performance. Similarly, Windows Update, while automatic, can be further refined. Microsoft also offers a command-line tool for installing and updating popular applications, and we’ll introduce a program that provides convenient control through a graphical user interface.
1. Mastering Windows Explorer’s Search
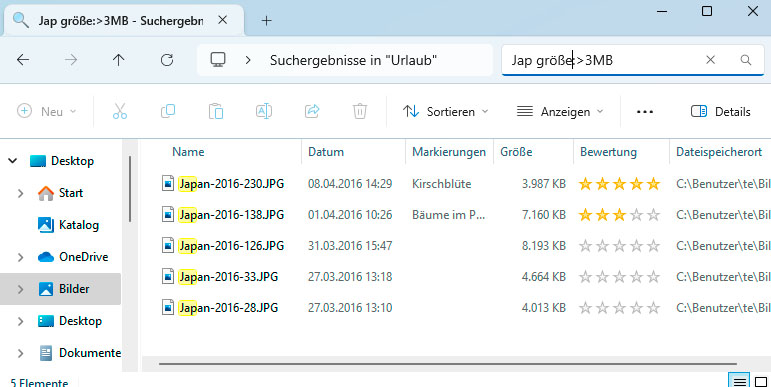
Searching for files and folders by name or content can be slow, especially on full hard drives. Knowing the likely folder location speeds things up considerably. Windows searches fastest within your user profile folders, as it automatically creates a search index for these, cataloging file names and sometimes content. You can add other folders to this index, such as those on a secondary hard drive (see section 3).
To search, open Windows Explorer, navigate to the target folder, and enter your search term in the top-right field. In Windows 11, the search begins immediately. Windows 10 users press Enter or the arrow key.
During an active search, Windows 10 displays the “Search Tools” tab, while Windows 11 shows the “Search Options” button. Both allow you to refine results. You can filter by modification date (e.g., “Yesterday,” “This week”) or file type (e.g., “Document,” “Folder”). Windows appends these to your search query—for example, adding “kind:document” to search for documents. Some options have been removed in Windows 11. Windows 10 also offers metadata searches under “Other properties” (see section 2) for criteria like “Authors” or “Tags.”
Microsoft’s documentation of advanced search syntax is incomplete. Keywords also vary by system language and can sometimes mix English and German. A slightly older but largely relevant list can be found here. Here are some example queries:
changedate:>1/11/2023: Finds files changed after the specified date.changedate:>1/11/2023<11/30/2023: Finds files changed between the two dates.size:>1GB: Finds files larger than 1GB.author:John: Finds files where the author is John.keywords:important: Finds files with “important” in their keywords.rating:5: Finds files rated with 5 stars.System.GPS.Latitude:(28 9): Searches image files for the specified GPS coordinates.
Search results can be used in many ways. Locate large, infrequently used files for archiving. Queries with “keywords:” or “author:” help find specific files or compile files based on criteria. Section 2 explains customizing file properties. You can manipulate search results just like any other Explorer view, selecting, copying, and moving files.
2. Editing File Properties
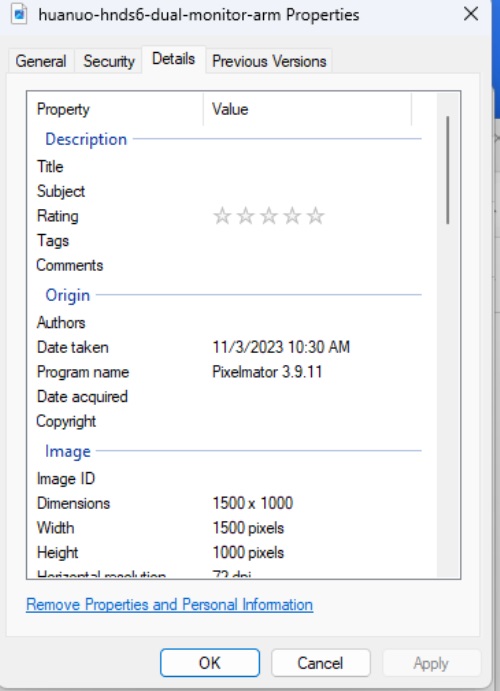
Every file has standard attributes like creation and modification dates. Some types, such as JPGs, contain metadata. The available metadata depends on the camera or image editing software. Right-click an image file in Explorer, select “Properties,” and go to “Details.”
You’ll typically find information about the camera manufacturer, exposure time, and GPS data. Edit or add data by clicking the “Value” field. Options include Title, Subject, Rating, and Tags. Selecting multiple images before accessing “Properties” lets you edit metadata for all at once.
In Windows 10, navigate to View > Details pane. Explorer displays key information in a separate column, editable and savable there.
Windows 11 users go to View > Show > Details pane. Editing isn’t possible here. Instead, use the “Properties” button to access the “Details” tab for customization.
Customizable metadata for other file types depends partly on installed programs. It’s possible by default for .doc files, but .docx requires Microsoft Office. LibreOffice files also require their respective suite. Explorer only displays the metadata; changes are made within LibreOffice via File > Properties.
Metadata is useful for searching (section 1) and display in Explorer. Activate View > Show > Details, right-click a column header, and select “More.” Check desired properties like “Tags” and “Rating.” Sort by these properties by clicking the column header. This also works in search results when using the “Details” view.
3. Customizing Indexing Settings
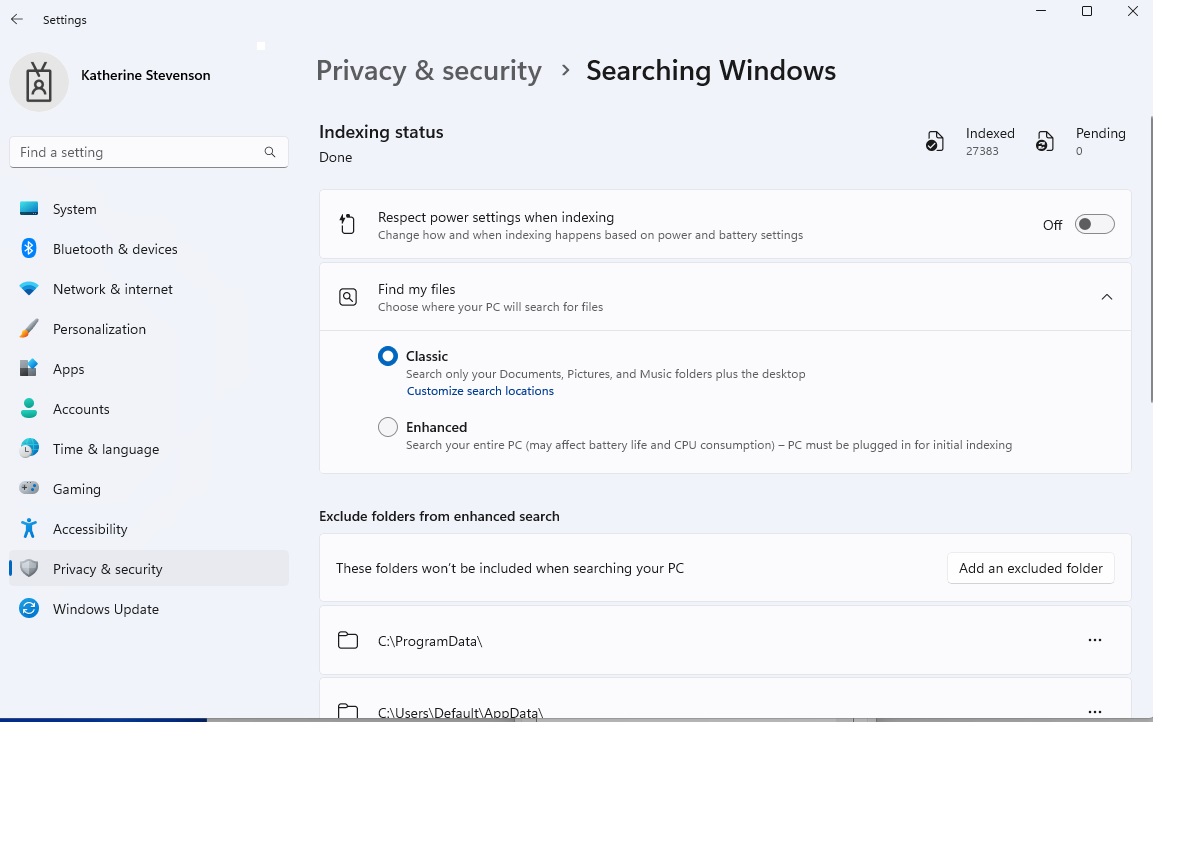
Windows indexes files in your user profile and the “Public” folder by default. You can add or remove folders.
Open “Settings” (Win+I), search for “indexing,” and click “Searching Windows.” The default option is “Classic,” covering user files. “Enhanced” expands the search to other folders. Below is a list of excluded folders, which you can modify.
Access detailed settings via “Advanced indexing options” (Windows 10: “Advanced Search Indexer Settings”). Click “Modify,” expand the tree view, and check the desired folders.
Click “Advanced.” Optionally, check “Index encrypted files.” The “File Types” tab lists extensions and filter descriptions. For each entry, choose between “Index properties only” and “Index properties and file contents.”
4. Faster Hard Drive Searches
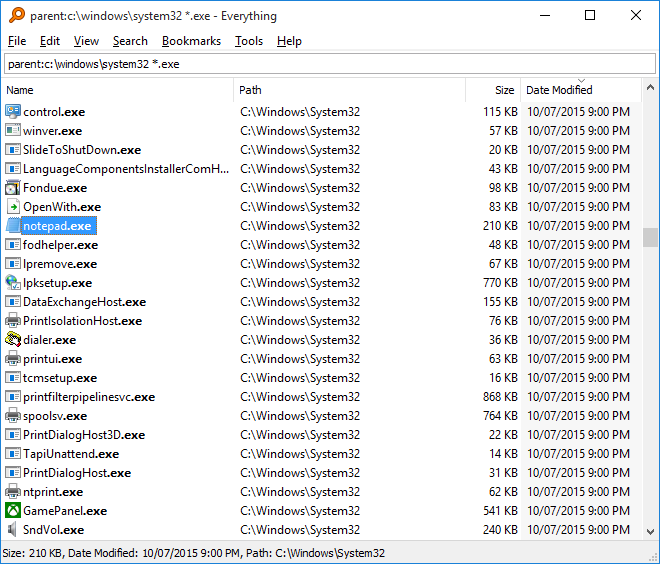
Windows search index updates can be delayed, so recent files often don’t appear in results. The Everything search tool provides real-time search across all hard drives with exceptional speed.
Its secret: Everything doesn’t create a full-text index. Instead, it uses the NTFS file system’s Master File Table (MFT), which contains file and folder names and their directory tree hierarchy. Everything uses this to build a small database of full path names. This takes a moment initially, but the tool then monitors the file system, instantly updating its database. However, Everything only searches file and folder names, not content.
Everything offers options in the “Search” menu. Limit searches to file types like “Documents” or “Images.” Search > Manage Filters lets you edit filters and add file extensions. Create custom search filters as well.
Tools > Options under Indexes > NTFS allows excluding specific drives.
If “Automatically remove offline drives from database” is unchecked, Everything retains file and folder names from external drives, allowing you to search them even when disconnected.
5. Quickly Transferring Files
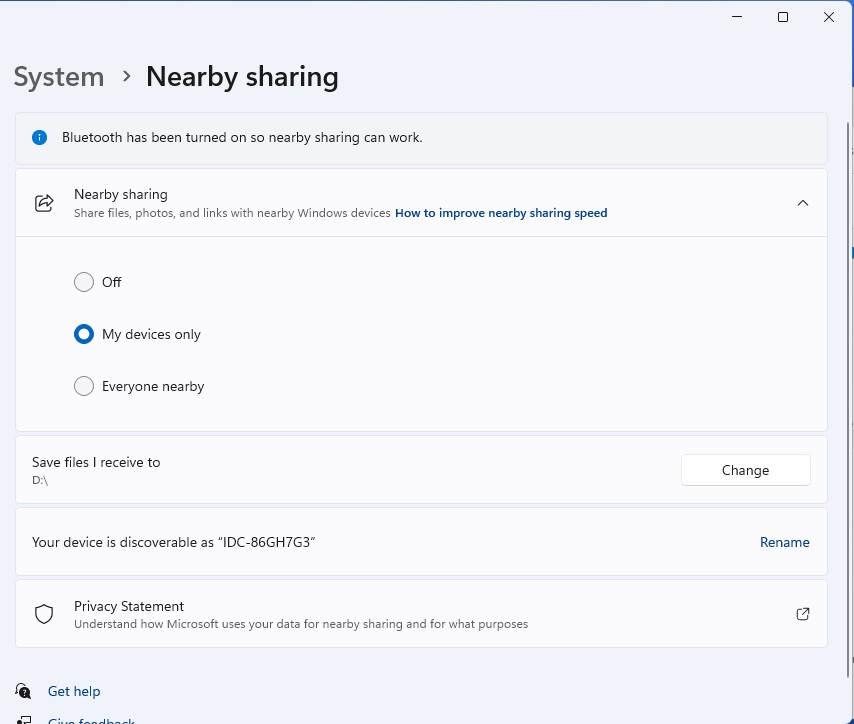
Network shares can transfer files, but setup is complex. Nearby Sharing is simpler. Prerequisites: Bluetooth and Wi-Fi or Ethernet enabled on all devices. In “Settings,” navigate to System > Nearby sharing (Windows 10: System > Shared experiences). Choose “My devices only” if you use the same Microsoft account everywhere, or “Everyone nearby” otherwise. Configure a destination folder for received files.
To send, select “Share” in the context menu and click the target PC’s name. The recipient must confirm the transfer.
The Nearby Sharing app in Windows can also receive files from Android devices, but it cannot currently send files to them.
6. Searching File Content
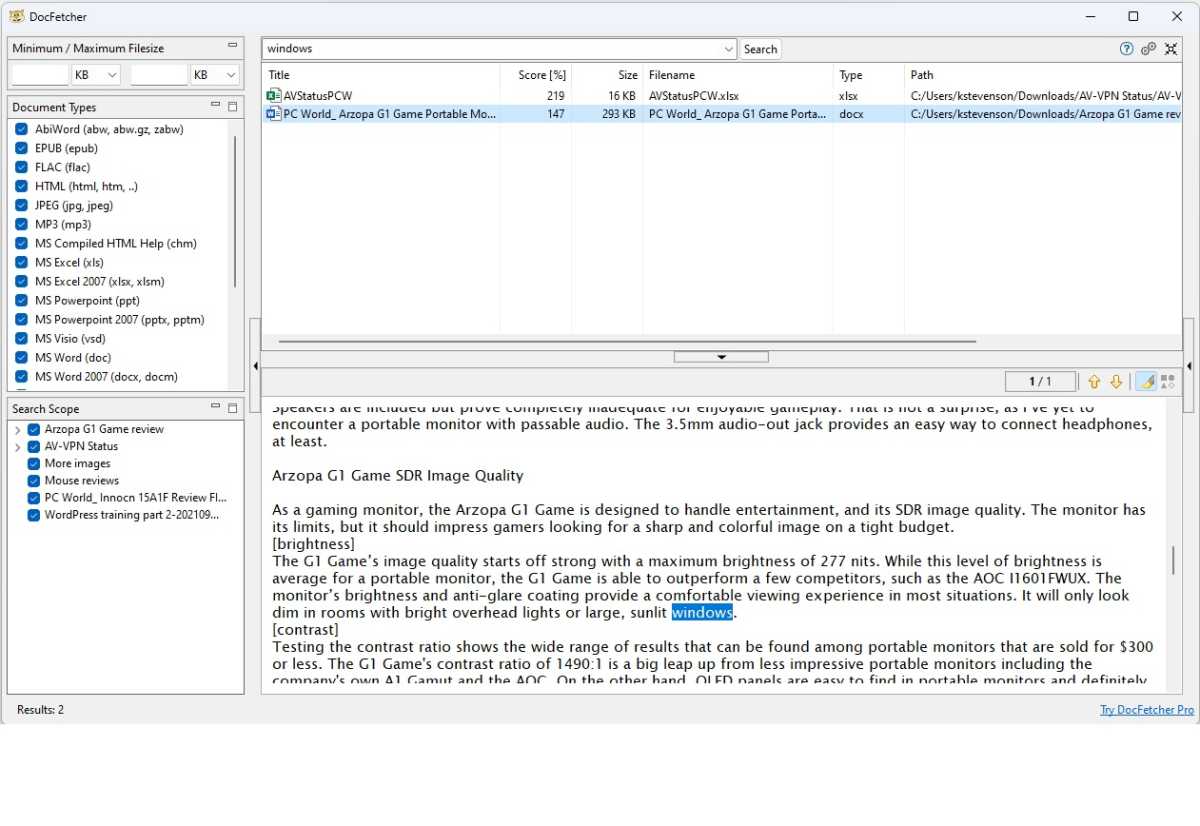
For text-based searches, DocFetcher is a strong choice. It requires a Java runtime environment.
First, create a search index. Right-click in the “Search Scope” pane and select Create Index From > Folder. Choose the target folder and click “OK.” Include multiple folders.
DocFetcher searches LibreOffice, Microsoft Office, PDF, RTF, HTML, plain text, MP3, and JPG files, including annotation tags. It analyzes text information but doesn’t handle image Exif tags or audio bitrates.
DocFetcher automatically detects changes and adds them to the index. You can also manually refresh by right-clicking an entry in the “Search Scope” and selecting “Refresh.” This is quick, as it only processes new or changed data.
7. The Old and New File Explorer in Windows 11
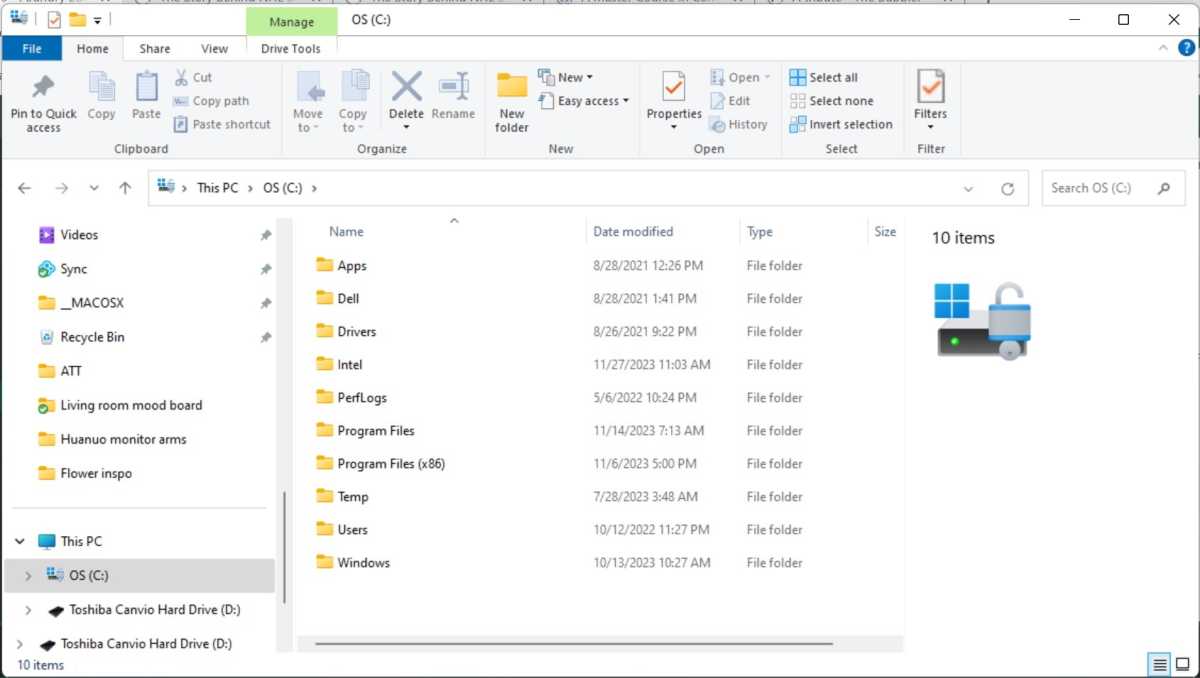
Windows 11’s Explorer has been revamped. The Windows 10 ribbon is replaced with a toolbar with icons for actions like “Copy” and “Rename.” The context menu is also simplified. Access additional options, like Explorer extensions, by holding Shift while right-clicking.
To restore the previous context menu, use Winaero Tweaker. Navigate to Windows 11 > Classic Full Context Menus. Check “Enable classic full context menus” and click “Restart Explorer.”
Use the old Explorer: Windows 10’s file manager is still present in Windows 11. Press Win+R, type “control,” and press Enter to open the Control Panel. Type “C:” in the address bar and press Enter. The familiar Windows 10 Explorer with its ribbon and full context menus will appear.
For quicker access, use Winaero Tweaker’s Windows 11 > Enable Ribbon and click “Launch File Explorer with Ribbon.” Create a shortcut with “Create Desktop Shortcut for Ribbon Explorer.”
8. Using Quick Launch on the Taskbar
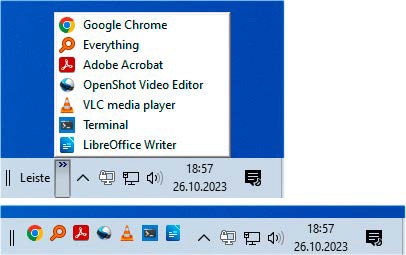
Windows 11’s taskbar is also streamlined. Creating custom toolbars is no longer possible. In Windows 10, right-click the taskbar and select Toolbars > Desktop. Click “>>” in the “Desktop” toolbar to see desktop shortcuts.
If “Lock the taskbar” is unchecked, resize the “Desktop” bar to see buttons. Disable “Show text” and “Show title” in the toolbar’s context menu to display only icons. Toolbars > New toolbar lets you select any folder, displaying its shortcuts in the toolbar.
These toolbars aren’t directly available in Windows 11. System Tray Menu can replicate similar functionality. Extract the tool and run SystemTray-Menu.exe. Initially, specify a folder for shortcuts. If empty, Explorer opens to that folder. Create shortcuts or copy them from the desktop.
Clicking the taskbar icon or using Ctrl+Win opens a window showing shortcuts. Click the gear icon. On the “General” tab, check “Start with Windows” for autostart.
9. Streamlined Software Installation and Updates
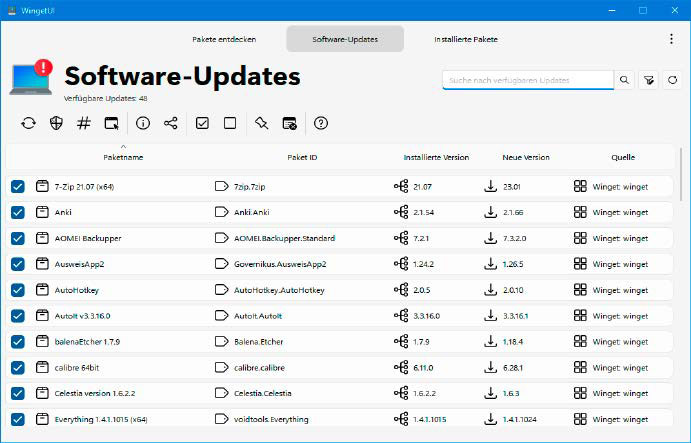
Typically, Windows applications handle their own updates. Notifications appear or messages display on startup.
Winget, a Microsoft command-line tool, automates software installation and updates. It’s pre-installed on most current Windows systems. If not, search for “App Installer” in the Microsoft Store. Open a command prompt or PowerShell. Type winget and press Enter to see available options.
For easier use, install Wingetui. “Discover packages” lets you search for software, and “Software updates” lists available updates. Click the leftmost toolbar icon to update selected applications.
10. Minimizing Distractions with Focus Assist
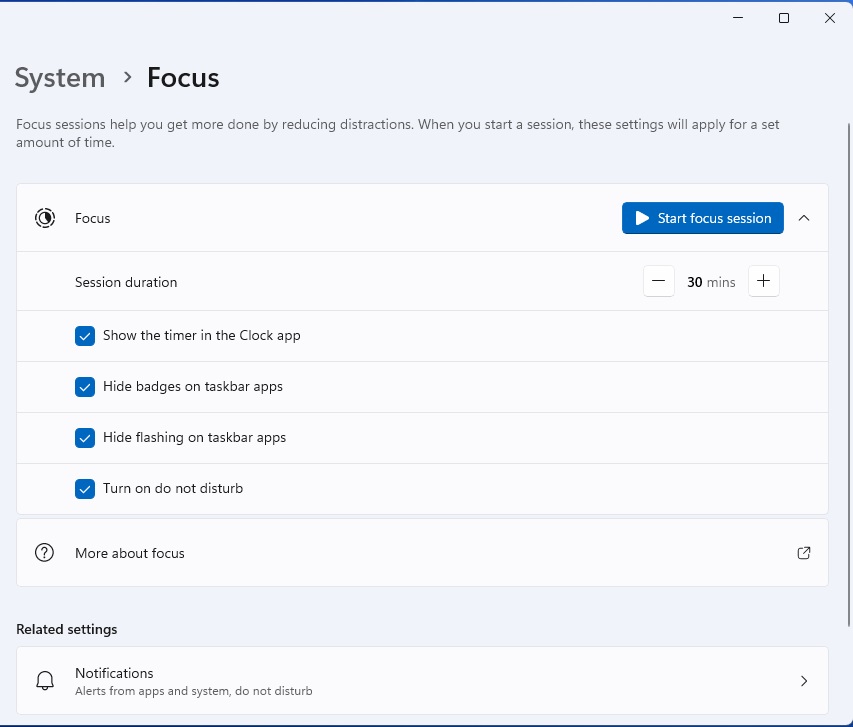
Email, messaging apps, and social media constantly vie for our attention. Windows 11’s Focus Assist helps minimize distractions.
In “Settings,” go to System > Focus. Set the session duration and choose options below. “Show timer in clock app” displays a window showing the focus period.
Uncheck “Turn on do not disturb automatically” to minimize notifications. Customize this under “Related settings” in “Notifications.” “Set priority notifications” controls which apps can interrupt during “Do not disturb.” View all notifications by clicking the taskbar clock.


