Sharing files and resources within a local network is a common need, and Windows 11 offers a streamlined approach to achieving this. This guide provides a step-by-step walkthrough for establishing a workgroup-based local network in Windows 11, ensuring seamless connectivity and resource sharing among your devices.
Understanding the Basics of Windows 11 Networking
A workgroup in Windows 11 allows interconnected devices to recognize and interact with each other. This functionality relies on file and printer sharing, enabling the exchange of documents, multimedia files, and other data within the network. Connecting your devices to a WLAN router, either via Ethernet or Wi-Fi, forms the foundation of this network. The router’s DHCP server automatically assigns unique IP addresses, simplifying the communication process.
Essential Steps for Network Setup
Before diving into the configuration, ensure all devices are connected to the same router. Then, proceed with these crucial steps:
Verifying the Network Profile
Windows 11 utilizes network profiles to determine access permissions. For a private workgroup, set the network profile type to “Private.” Navigate to Settings > Network & Internet > [Your Network Connection (Ethernet or Wi-Fi)] > Properties and select “Private” under “Network profile type.”
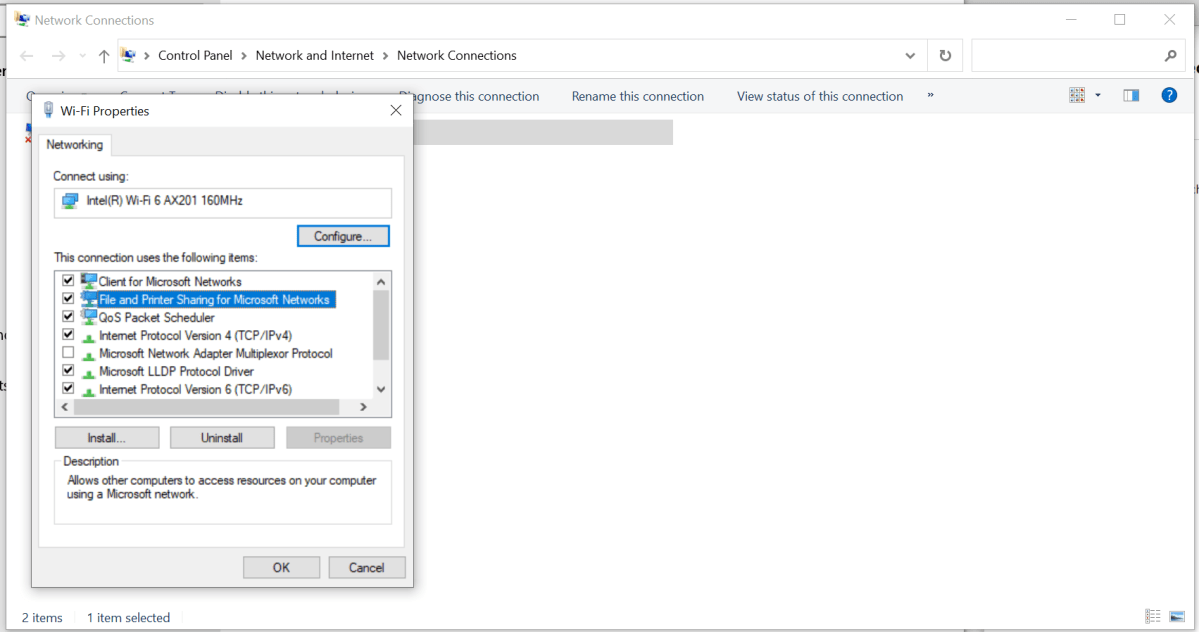 Windows 11 networkingEnabling File and Printer Sharing is key for network functionality.
Enabling Network Features
Activate “File and printer sharing for Microsoft networks” to enable resource sharing. Access this setting through Settings > Network and Internet > Advanced network settings > Change adapter options. Right-click your network connection, select “Properties,” and ensure the “File and printer sharing for Microsoft networks” option is checked. Alternatively, access this through the Control Panel via Network and Internet > View network status and tasks > Change adapter settings.
Customizing the Computer Name
A unique and descriptive computer name is essential for easy identification within the network. Find your current computer name in the System settings within the Settings app. To change it, click “Rename,” enter the desired name (letters, numbers, and hyphens only), click “Next,” and restart your computer.
Defining the Workgroup
While not mandatory, customizing the default workgroup name (“WORKGROUP”) can enhance organization. Search for “Workgroup” in the Settings app and click “Change workgroup name.” Click “Change,” select “Workgroup,” enter your desired name, and click “OK.”
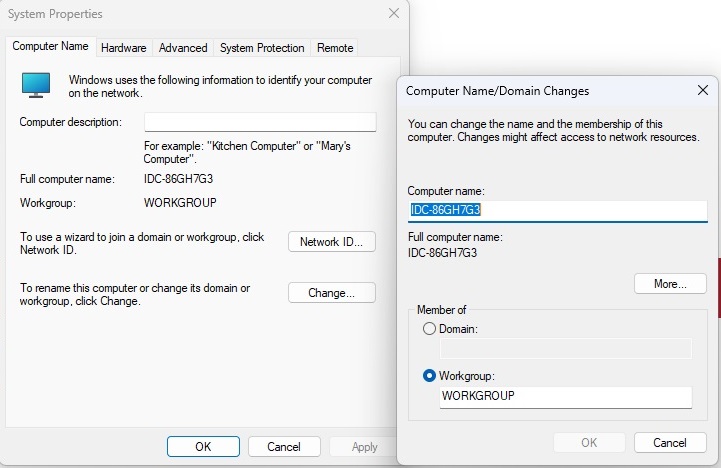 Workgroup Windows 11Customizing your workgroup name can improve network organization.
Enabling Network Discovery
Network discovery allows other devices to find your computer on the network. This is typically enabled automatically with the “Private” network profile. Verify this in the Control Panel under Network and Internet > View network status and tasks > Change advanced sharing settings. Ensure “Turn on network discovery” is selected under “Private.”
Utilizing a Microsoft Account
For seamless access across the network, log in to each Windows 11 PC with the same Microsoft account. This eliminates the need for managing individual user accounts and permissions on each machine. If you’re using a local account, switch to a Microsoft account in Settings > Accounts > Your info.
Accessing the Network
Once these configurations are complete, access your network through File Explorer. Click “Network” in the left-hand navigation pane. Windows will display connected computers, identified by a monitor icon. Other network devices might also appear here.
Troubleshooting Network Issues
If computers aren’t visible on the network, consider these troubleshooting steps:
- Network profile: Verify the “Private” network profile is selected.
- Router settings: Check for security settings on your router that might block inter-device communication.
- Guest access: Ensure devices aren’t connected via guest Wi-Fi, which restricts network access.
- Workgroup consistency: Confirm all computers are in the same workgroup.
- Firewall: Check your firewall settings to allow network access.
- Advanced sharing settings: Ensure file and printer sharing is enabled under “Private” in the advanced sharing settings.
Expanding Your Network
Integrating additional Windows devices is straightforward. Ensure they’re connected to the router, enable “File and printer sharing for Microsoft networks,” configure the computer name (unique within the network), and set the workgroup name to match the existing network. Utilize the Windows 11 troubleshooting tool for assistance with any connection issues.
Conclusion
Setting up a local network in Windows 11 is a manageable process with significant benefits for resource sharing and collaboration. By following this guide, you can establish a robust and efficient network environment for your devices. Remember to prioritize security best practices, especially in shared environments.


