Whether your gaming rig boasts the latest graphics card or houses an older model yearning for a refresh, undervolting your GPU can unlock significant benefits. This process can tame power consumption, reduce operating temperatures and noise levels, and in some instances, even boost performance. While it requires some technical understanding, undervolting is surprisingly straightforward once you grasp the fundamentals. This guide provides a comprehensive walkthrough, equipping you with the knowledge to undervolt both Nvidia and AMD graphics cards.
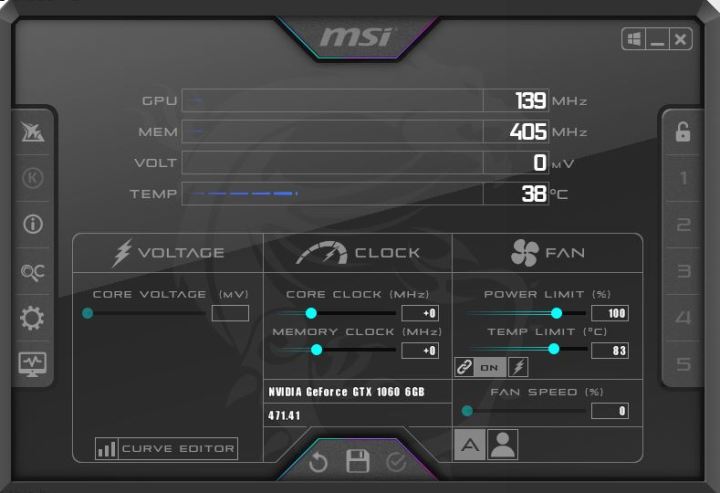 MSI Afterburner interface.
GPU Undervolting Prerequisites
Before diving in, it’s crucial to acknowledge that not all GPUs are suitable candidates for undervolting. Older Nvidia cards prior to the 10 series (Pascal architecture) often have locked voltages, rendering common undervolting tools ineffective. Workarounds exist, but they typically involve complex procedures best left to experienced users. On the other hand, AMD cards, even older models, generally support undervolting. Notably, some AMD GPUs, like the Vega series, might experience performance improvements after undervolting due to increased power and thermal headroom.
Undervolting Nvidia GPUs: A Step-by-Step Guide
Undervolting Nvidia GPUs requires a more involved approach compared to AMD. Follow these steps to successfully undervolt your Nvidia card:
1. Install MSI Afterburner
MSI Afterburner is the go-to tool for Nvidia GPU undervolting. Download and install this free software from the official MSI website (https://www.msi.com/Landing/afterburner/graphics-cards).
2. Access the Curve Editor
Launch MSI Afterburner. In the lower left corner, you’ll find your GPU’s voltage information. Below that lies the Curve Editor. Access it by double-clicking or pressing CTRL + F.
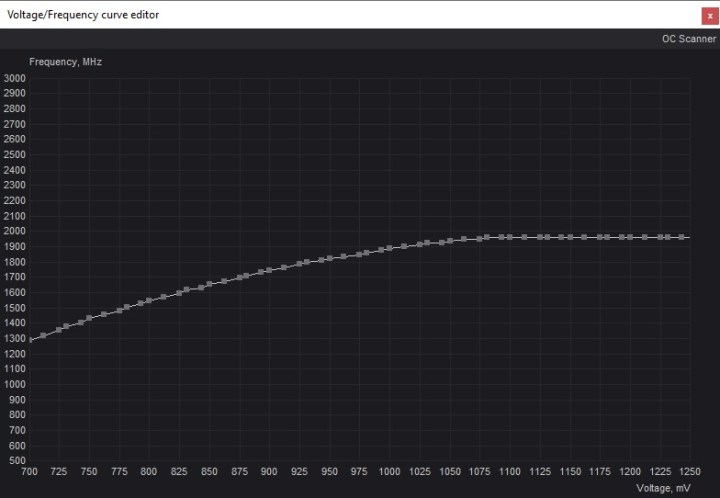 MSI Afterburner Curve Editor.
3. Determine GPU Frequency Under Load
Before adjusting anything, ascertain your GPU’s frequency under stress. Run a demanding game or a stress test like FurMark (https://geeks3d.com/furmark/). Running a graphically intensive game for 15 minutes should suffice.
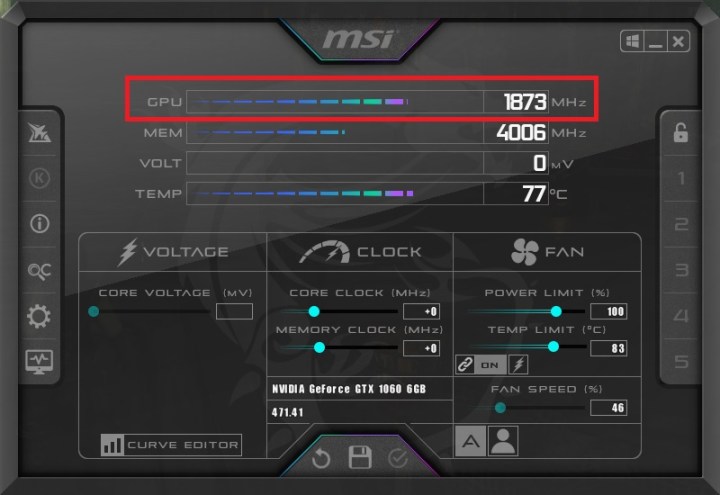 MSI Afterburner GPU Frequency tool.
4. Identify Corresponding Voltage
Return to the Curve Editor and locate your observed frequency on the Y-axis. Click along the curve until the frequency displayed on the left matches your recorded value. Note the corresponding voltage on the X-axis.
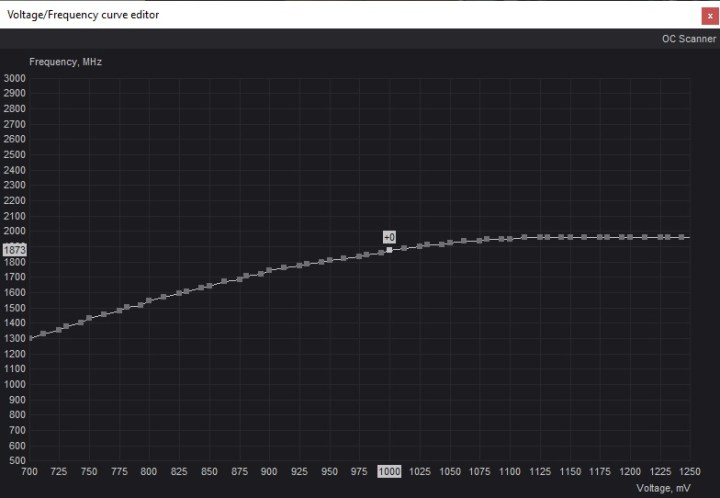 GPU frequency and voltage in MSI Afterburner.
5. Lower the Voltage
Undervolting involves trial and error. Start by reducing the voltage incrementally, for instance, by 50mV. Click on your target voltage in the Curve Editor. Note that this will initially link to a lower frequency.
6. Adjust Core Clock
In the main MSI Afterburner window, adjust the Core Clock (MHz) to compensate for the frequency drop. Increase the core clock until the curve in the Curve Editor reflects your desired frequency at the lower voltage.
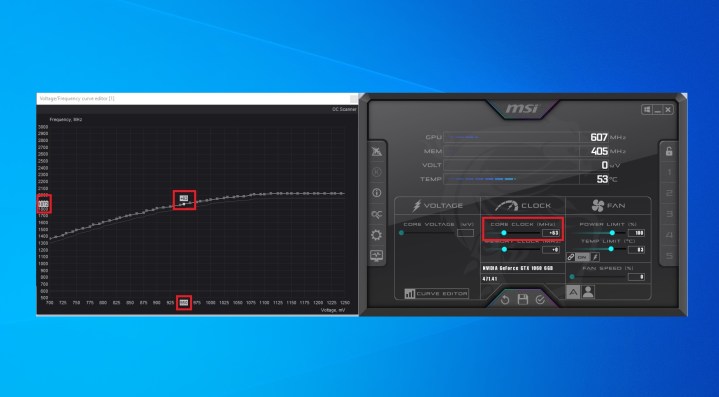 MSI Afterburner interface.
7. Save and Test
Save your settings by clicking the floppy disk icon in MSI Afterburner. Test your undervolt by running the same game or application used earlier. Monitor the frequency and voltage to ensure they match your target values.
8. Stress Test (Recommended)
For thorough validation, run a dedicated stress test like FurMark (https://geeks3d.com/furmark/) or 3DMark Time Spy (https://www.3dmark.com/). If your system remains stable, you’ve successfully undervolted your Nvidia GPU.
Undervolting AMD GPUs: A Simplified Approach
AMD simplifies undervolting by integrating it directly into the Radeon driver software:
1. Open Radeon Software
Right-click on your desktop and select AMD Software: Adrenaline Edition.
2. Navigate to Tuning
Go to Performance > Tuning.
3. Undervolt the GPU
You can opt for automated undervolting by selecting Undervolt GPU. For manual control, enable GPU Tuning and Advanced Control.
4. Lower the Voltage
In the Voltage (mV) section, decrease the voltage by 10mV and apply the changes.
5. Test and Repeat
Run a stress test like FurMark or 3DMark. If stable, repeat the voltage reduction until you encounter instability. Revert to the last stable voltage for daily use.
Conclusion
Undervolting your GPU can optimize performance and reduce power consumption. By following these detailed steps, you can unlock the potential of your graphics card, whether it’s an Nvidia or AMD model. Remember to proceed with caution and test thoroughly after each adjustment to ensure stability.


