Rufus is a free and open-source utility that simplifies the creation of bootable USB drives, particularly for Windows installations. While Microsoft offers its own Media Creation Tool, Rufus provides greater flexibility and control over the setup process. This guide explores how to use Rufus and highlights its advantages.
Why Choose Rufus over the Media Creation Tool?
Microsoft’s Media Creation Tool is designed specifically for creating Windows 10 or 11 installation media. Rufus, however, extends its capabilities beyond Windows, supporting Linux distributions, live operating systems, emergency recovery tools, and other bootable ISO files. Furthermore, Rufus handles Virtual Hard Disks (VHD) and disc image files (IMG), even enabling BIOS updates from DOS directly from the USB drive.
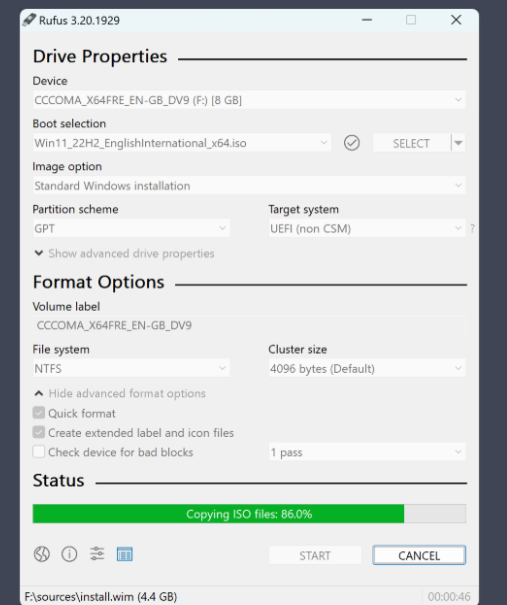 Rufus screenshot showing the main interface and options
Rufus offers a selection of pre-configured system options for creating bootable USB drives, and this selection can be expanded by loading custom ISO files. This is particularly useful for older computers and motherboards that require specific boot modes for BIOS updates.
Rufus provides a clearer distinction between UEFI and BIOS compatibility modes during Windows setup, a crucial advantage over the Media Creation Tool. This allows for more control over the installation process, especially on older hardware. Additionally, Rufus can bypass Windows 11 hardware requirements, enabling installation on older machines. The tool also streamlines the process by directly downloading and processing the desired Windows version. Finally, Rufus supports the creation of “Windows To Go” installations, allowing a fully functional Windows environment to run directly from the USB drive.
Normal vs. Portable Rufus: Which Version to Choose?
The Rufus website offers two versions for 64-bit Windows systems: a standard installer and a portable version (denoted by “p”). While both versions can run without a formal installation process, the key difference lies in the automatic update functionality. The portable version disables automatic updates by default, whereas the standard version checks for updates daily. This setting can be toggled in the program settings for both versions. Similarly, advanced drive properties and formatting options are hidden by default in the portable version but can be enabled in the settings. Note that the website also provides “x86” for 32-bit Windows systems and “arm64” for Windows on ARM architecture.
Creating a Windows Installation USB Drive with Rufus
Despite offering more configuration options, Rufus doesn’t complicate the process of creating a bootable Windows installation drive. By hiding the advanced drive properties and formatting options, Rufus presents a simplified interface. You’ll need a USB drive with at least 8GB of storage. Once inserted, the drive will be recognized under “Drive.” Click “Select” to choose the desired Windows ISO file, which can be downloaded from the official Microsoft website. Generally, accepting the default settings for partition scheme, target system, and file system is sufficient. Click “Start,” confirm the prompts, and wait for Rufus to complete the process. Remember that Rufus will erase the existing contents of the USB drive, so back up any important data beforehand.
Selecting UEFI or CSM Compatibility Mode
Rufus allows you to specify the boot mode for your Windows installation, choosing between the modern UEFI mode or the older BIOS (CSM) compatibility mode. When using Microsoft’s Media Creation Tool on older hardware, it can be unclear whether the installation will use CSM (Legacy) with MBR partitioning or UEFI with GPT partitioning. While this can be checked later in Windows settings, it might not be configurable depending on the hardware and BIOS/UEFI settings. Rufus, on the other hand, lets you define the partitioning scheme and target system upfront. Whenever possible, choose “GPT” and “UEFI (without CSM).” If booting or installation fails, and BIOS/UEFI settings adjustments don’t resolve the issue, create a new USB drive using the “MBR” and “BIOS (or UEFI-CSM)” settings in Rufus. Rufus also offers a dual-boot option (activated by pressing Alt-E) that configures the USB drive for both UEFI and legacy hardware, using “MBR” and “BIOS or UEFI” settings.
Bypassing Windows 11 Hardware Requirements
While Microsoft has stricter system requirements for Windows 11, Rufus allows installation on PCs that don’t officially meet these criteria. These requirements include UEFI, Secure Boot, TPM 2.0, and a compatible processor (at least 8th generation Intel Core i CPUs). Since some 7th generation processors can handle Windows 11, bypassing the hardware check during setup can be beneficial. Rufus simplifies this process. After loading the Windows 11 ISO and inserting the USB drive, click “Start.” In the dialog box, select “Remove requirement for 4GB RAM, Secure Boot and TPM 2.0” to bypass the hardware check. You can also disable the online account requirement and automatic hard drive encryption.
Performing a Clean Windows Installation
With Rufus creating a bootable USB drive, a clean Windows installation becomes straightforward. Insert the USB drive into the powered-off computer, turn it on, and press the designated key to select the USB drive as the boot device. This key varies depending on the manufacturer and is usually displayed briefly during startup. Older PCs might require changing the boot sequence in the BIOS. Follow the on-screen prompts in the Microsoft setup wizard, ensuring you select the correct partition for installation to avoid data loss. Windows 11 version 24H2 explicitly requires confirmation to delete existing files, apps, and settings on the chosen partition.
Upgrading Windows 11
Upgrading a running Windows system is generally simple, but caution is needed. Newer computers typically receive major updates (e.g., from Windows 11 23H2 to 24H2) or upgrades (from Windows 10 to 11) through Windows Update. However, if the hardware doesn’t meet the new OS requirements, the update might fail. A Rufus-created installation USB can help. Insert the USB drive into the running computer and double-click “Setup.exe.” Crucially, select “Change how updates are downloaded from Setup -> Not now” in the first dialog. Accept the prompts, and the upgrade will commence, transferring your existing programs, files, and settings.
Downloading Windows Installation Files Directly Within Rufus
Rufus can download Windows 10 and 11 ISO files directly, although this option might be hidden depending on the settings. Instead of downloading the ISO separately, you can do this within Rufus. Click the small black arrow to the right of the “Select” button and choose “Download.” If this option isn’t available, click the “Show application settings” button (second from the right at the bottom), set “Check for new version” to “Daily (default),” close the window and program, and restart Rufus. Then, you can select the desired Windows version, initiate the download, and create the bootable USB drive.
Creating a Windows To Go Drive
While Microsoft has discontinued “Windows To Go,” Rufus still allows you to create a fully functional Windows installation on a USB drive. Keep in mind that running Windows from a USB drive is significantly slower than from a hard drive. For a Windows To Go installation, use a USB drive with at least 16GB, preferably 32GB, of storage. After inserting the drive, select the downloaded Windows ISO file in Rufus. In the “Image property” field, choose “Windows To Go,” review the other options, and click “Start.” Follow the prompts to select the Windows version (Home or Pro) and other settings. Click “OK” to create the Windows To Go drive.


