Blocking websites can be essential for various reasons, from protecting children from inappropriate content to maintaining focus while working. This guide provides comprehensive methods for blocking websites on different operating systems and through various tools, including parental controls, host files, browser extensions, and router settings.
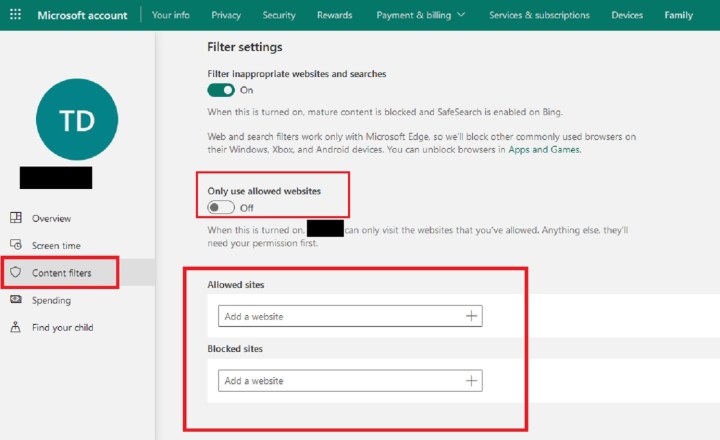 Microsoft Account Family Settings screenshot
Microsoft Family Settings – Content Filters
Blocking Websites with Parental Controls in Windows
Windows offers built-in parental controls to manage access to websites on child accounts.
-
Create a Child Account: Navigate to Settings > Accounts > Family & other users > Add a family member > Add a child. Follow the on-screen instructions to set up the account. If you already have a child account, skip this step.
-
Access Family Settings: Go to your Microsoft account page and select your child’s account. Click “Content filters.”
-
Configure Web Filtering: Under the “Web and search” tab, you have several options:
- Only use allowed websites: Restrict access to only the websites you specifically list.
- Allowed and blocked websites lists: Create customized lists of allowed and blocked websites even without enabling the “Only use allowed websites” option.
To add websites to either list, enter the URL in the respective section and click the plus icon.
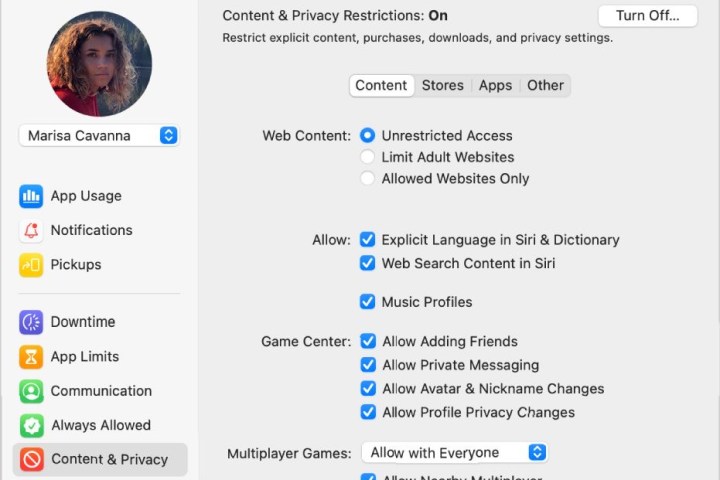 Blocking websites on macOS.
macOS Screen Time Settings
Blocking Websites with Parental Controls in macOS
macOS provides Screen Time, a feature that allows control over app and website usage.
-
Open Screen Time: Go to System Preferences > Screen Time.
-
Select User Profile: Choose the user profile you want to manage from the dropdown menu.
-
Configure Web Content: Click “Content & Privacy.” Under the “Web Content” section, choose one of the following options:
- Unrestricted Access: Allows access to all websites.
- Limit Adult Websites: Automatically blocks adult content with the option to add specific websites to the block list.
- Allowed Websites Only: Restricts access to only the websites you explicitly allow. Click “Customize” to add allowed websites.
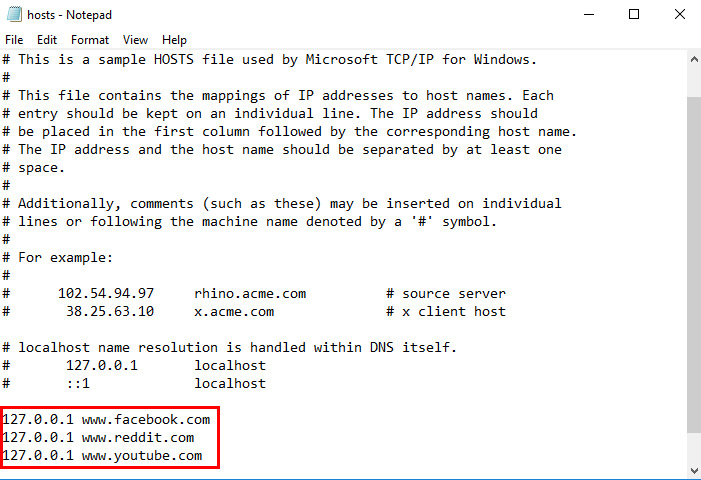 Adjusting the hosts file on Windows.
Editing the Hosts File in Windows
Blocking Websites Using the Hosts File (Windows)
The Hosts file can redirect website access to your local computer, effectively blocking them. This requires administrator privileges.
-
Open Notepad as Administrator: Search for “Notepad,” right-click, and select “Run as administrator.”
-
Open the Hosts File: In Notepad, go to File > Open and navigate to C:WindowsSystem32driversetchosts. Ensure “All Files” is selected in the file type dropdown.
-
Add Websites to Block: For each website, add a new line following this format:
127.0.0.1 www.example.com. Replacewww.example.comwith the website you want to block. -
Save Changes: Save the file without changing the name or location.
-
Test and Restart Browser: Test the blocked websites in your browser. You may need to restart your browser for the changes to take effect.
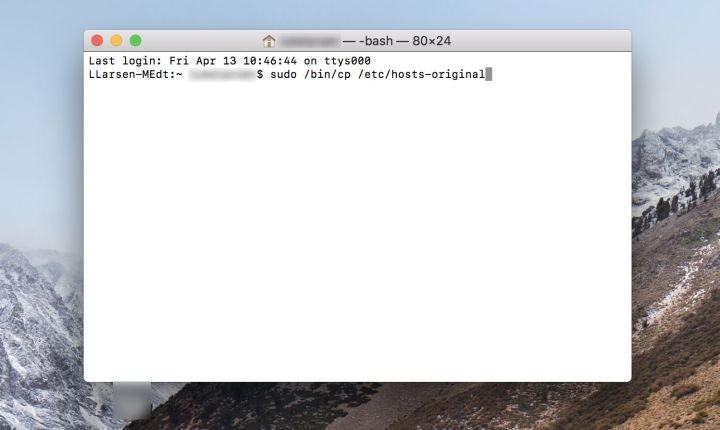 Adjusting the hosts fiel on a Mac.
Editing the Hosts File in macOS using Terminal
Blocking Websites Using the Hosts File (macOS)
Similar to Windows, the Hosts file in macOS can be used to block websites.
-
Open Terminal: Go to Applications > Utilities > Terminal.
-
Backup the Hosts File: Type
sudo /bin/cp /etc/hosts /etc/hosts-originaland press Enter. Enter your administrator password. -
Edit the Hosts File: Type
sudo nano /etc/hostsand press Enter. Enter your password. -
Add Websites to Block: For each website, add a new line:
127.0.0.1 www.example.com. Replacewww.example.comwith the desired website. -
Save Changes: Press Control+O to save, then Control+X to exit.
-
Flush DNS Cache: Type
sudo dscacheutil -flushcacheand press Enter. Alternatively, restart your computer. -
Test the Block: Open your browser and check if the websites are blocked.
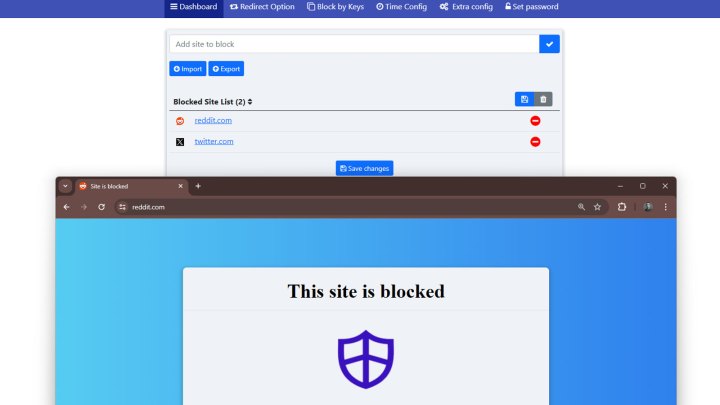 Blocked websites with extensions.
Website Blocker Extension in a Browser
Blocking Websites Using Browser Extensions
Browser extensions offer convenient website blocking with added features.
-
Install a Website Blocker: Search for a website blocker extension in your browser’s extension store. For example, “Website Blocker” for Chrome.
-
Add the Extension: Click “Add to Chrome” (or equivalent) and confirm.
-
Configure the Extension: Open the extension’s settings. Typically, you can add websites to a block list by entering their URLs. Many extensions also provide features for scheduling blocks and setting passwords.
Blocking Websites Using Router Settings
Routers can block websites network-wide, affecting all devices connected to the network.
-
Access Router Settings: Open your web browser and enter your router’s IP address (usually
192.168.1.1) in the address bar. Enter your router’s username and password. Consult your router’s documentation or routerpasswords.com or cirt.net if you don’t know these credentials. -
Find Content Filtering/Access Restrictions: Navigate to your router’s security settings. Look for options labeled “Access Restrictions” or “Content Filtering.”
-
Add Websites to Block: Enter the URLs of the websites you want to block. Save and apply your changes.
Conclusion
Blocking websites can be achieved through various methods depending on your needs and technical proficiency. From simple parental controls to more advanced host file modifications, there’s a solution for everyone. Combining these methods can provide comprehensive website blocking for enhanced security and productivity.


