Upgrading to the latest graphics card is the most effective way to boost your PC’s gaming prowess, but overclocking your existing GPU can unlock hidden potential without breaking the bank. Similar to a CPU, a GPU can be tweaked to operate at higher speeds, resulting in improved benchmark scores and higher frame rates. This guide will walk you through the process of safely overclocking your GPU, providing you with the knowledge and tools to achieve a noticeable performance gain.
Preparing for Overclocking
Before diving into overclocking, identify your graphics card model. This information can usually be found on the card itself, its packaging, or within the graphics settings panel (right-click your desktop, access Nvidia or AMD settings, and navigate to “My Rig” or “System”). Alternatively, the free utility GPUZ (https://www.techpowerup.com/gpuz/) provides comprehensive details about your GPU.
Next, update your graphics drivers to the latest version available from the Nvidia (https://www.nvidia.com/Download/index.aspx) or AMD (https://support.amd.com/en-us/download) website. This ensures optimal performance and compatibility. A system reboot is typically required after driver installation.
Download MSI Afterburner (https://www.msi.com/page/afterburner), a versatile overclocking tool compatible with most GPUs. While AMD offers Wattman and other third-party options exist, Afterburner’s comprehensive feature set makes it a solid choice for this guide.
To assess stability and performance gains, download a benchmarking tool. Unigine Valley (https://benchmark.unigine.com/valley) is a reliable and lightweight option. Furmark (https://www.ozone3d.net/benchmarks/fur/) provides real-time temperature monitoring. Consider installing games with built-in benchmarks for a practical performance evaluation.
Finally, cleaning your PC of dust can significantly impact GPU temperatures during overclocking. While not mandatory, it’s highly recommended.
Establishing Baseline Performance
Before overclocking, determine your GPU’s baseline performance metrics. Close all running applications and launch MSI Afterburner. For consistency, navigate to Settings > User Interface and select the “Default MSI Afterburner v3 skin.” Adjust the temperature units (Celsius/Fahrenheit) as needed.
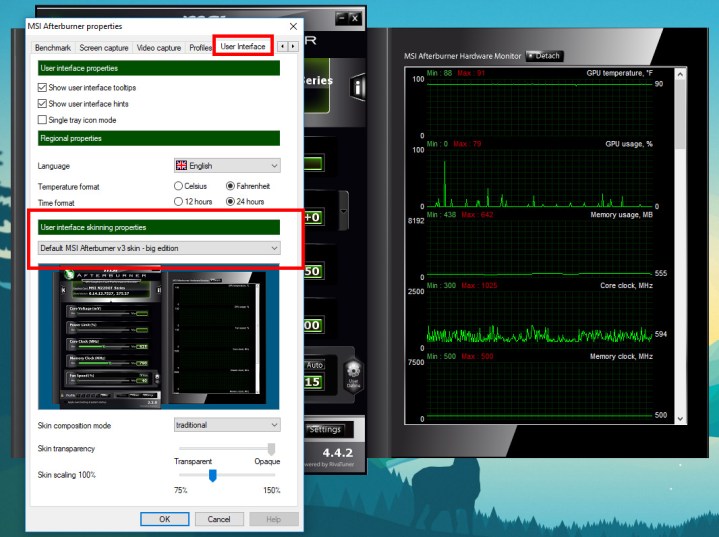 Image used with permission by copyright holder
Afterburner’s graphs display crucial information. The top graph shows the core temperature. Keep this below 176°F (80°C) to prevent instability and potential damage. The core clock and memory clock graphs display the current operating frequencies. The “Min” values represent idle speeds, while the “Max” values are reached under load.
Run the Valley benchmark in “Extreme HD” preset to establish a baseline performance score. Press F9 during the demo to initiate the benchmark.
 Image used with permission by copyright holder
Other benchmarking tools like Futuremark’s 3DMark (https://www.futuremark.com/benchmarks/3dmark/all) or in-game benchmarks can provide additional performance data.
Incremental Overclocking
Overclocking requires a cautious approach. Ensure your cooling solution is adequate (temperatures below 176°F/80°C during baseline testing). In Afterburner, uncheck “Apply overclocking as system startup” to avoid applying changes until stability is confirmed.
Launch Valley in “Windowed” mode and maximize the power limit in Afterburner. This allows the GPU to draw the necessary power for the overclocked settings without automatic throttling. It doesn’t alter the voltage.
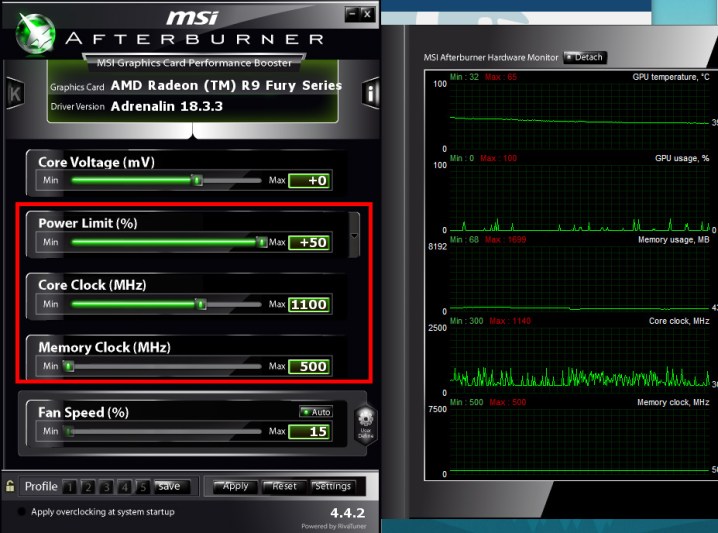 Image used with permission by copyright holder
Increment the core clock by 10MHz in Afterburner. Monitor the Valley window for visual artifacts (miscolored pixels, color bands). If none appear after a few minutes, increase the clock again. Repeat until artifacts or crashes occur. If the system crashes or the driver fails (black screen), reduce the clock by 20MHz and retest. Run Valley for several loops to confirm stability.
Reset the core clock to default and repeat the process for the memory clock. Watch for artifacts appearing as blocks or blobs of color. After finding the limit, decrease the clock slightly and perform a longer stability test.
Combining Core and Memory Overclocks
After determining the maximum stable core and memory clocks individually, combine them. It’s unlikely both maximums will be stable simultaneously. Gradually increase both clocks together, monitoring for artifacts and instability. Once a limit is reached, reduce both clocks slightly and run extended stability tests. You can then fine-tune individual clocks to pinpoint stability limitations.
Thorough stability testing is crucial. Run Valley for multiple loops, play games for several hours, and watch for issues. If problems arise, reduce the clocks incrementally and retest. Once a stable overclock is achieved, you can enable the “Apply overclocking as system startup” option in Afterburner.
Rerun your benchmarks to measure the performance gains from the stable overclock.
Voltage Adjustments (Advanced)
Increasing core voltage (mV in Afterburner) can improve stability and potentially allow for higher clocks. However, this is an advanced technique with higher risks. Increased voltage can reduce GPU lifespan and cause damage if misused. It also increases power consumption.
Voltage adjustments are disabled by default in Afterburner. Research safe voltage limits for your specific GPU model before enabling this feature in the Afterburner settings.
If adjusting voltage, increase it incrementally, monitoring GPU temperature and stability. Thorough testing is essential.


