Microsoft recently updated Word, changing the default fonts from Calibri (body text) and Calibri Light (headings) to Aptos and Aptos Display, respectively. If you prefer a different font, you can easily revert to Calibri or choose an alternative.
 alt text: Screenshot of the Font section in Microsoft Word's Home ribbon, highlighting the font selection dropdown menus for both body text and headings.
To change the default font for body text, open a new Word document. Ensure you’re on the “Home” tab of the ribbon. In the “Font” group, locate the dropdown menu labeled “(body text)”. Select your desired font (e.g., Calibri). Customize the font style and size if needed. Click the small arrow at the bottom right corner of the “Font” group.
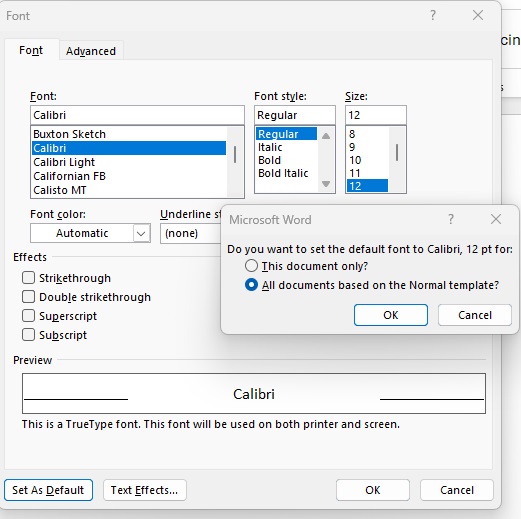
In the dialog box that appears, click “Set As Default.” Choose “All documents based on the Normal template” in the subsequent window. Confirm by clicking “OK” in both open dialog boxes.
 alt text: Screenshot of the 'Set As Default' dialog box in Microsoft Word, showing the option to apply the change to all documents based on the Normal template.
To change the default font for headings, repeat the process. On the “Home” tab, in the “Font” group, use the dropdown labeled “(headings)” to select your preferred font (e.g., Calibri Light). Adjust style and size as desired. Then, follow the same steps: click the small arrow, “Set As Default,” choose “All documents based on the Normal template,” and click “OK” to confirm.
By following these instructions, you can customize your Microsoft Word experience and ensure your documents consistently use your preferred fonts.


