Windows, Microsoft, and third-party developers offer powerful command-line tools, but their usage can be daunting for many. Graphical User Interfaces (GUIs) provide a more user-friendly experience. Instead of coding from scratch, developers often leverage command-line interfaces (CLIs) and system libraries behind the scenes. GUI tools simplify this process by presenting options clearly, processing return values, and displaying results within a window. This approach makes command-line tools more accessible, providing an overview of available options and helpful explanations. Here are some of the most useful GUI tools for Windows.
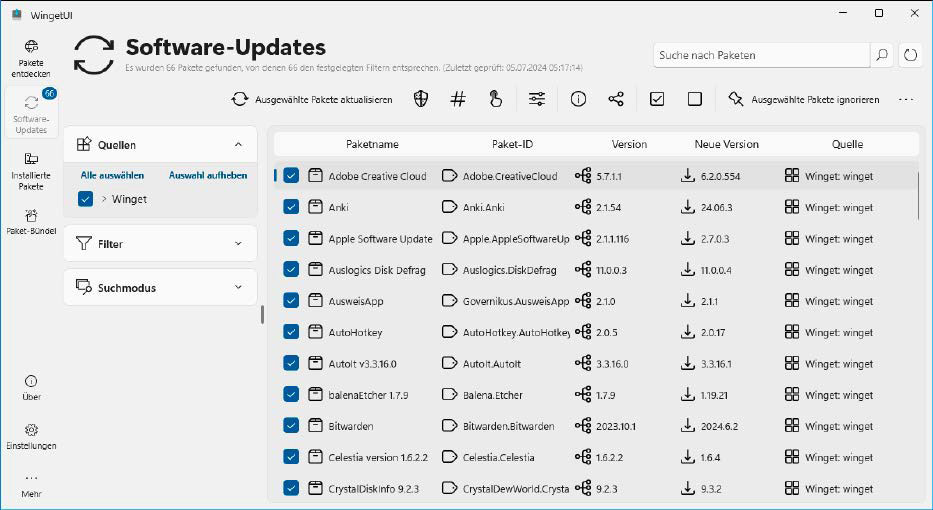 Central updater: Winget UI shows which software updates are available on the PC. The update can take place automatically – or you can manually select specific programs for the update.
1. Streamlined Software Installations and Updates
Managing software installations and updates can be a major hassle in Windows. Applications running in the background constantly prompt for updates, creating a disruptive workflow. Winget, a command-line tool available for Windows 10 and 11, simplifies this process. It enables easy software installation without navigating complex setup wizards and can update numerous programs, even those not installed through Winget.
Winget is typically pre-installed on Windows 10 and 11. Check the Microsoft Store Library for “App Installer.” If not present, install it and ensure it’s updated to the latest version for optimal functionality.
Winget UI provides a graphical interface for Winget and other package managers. For automatic updates, navigate to Settings > General settings and enable Update packages automatically. Under Start options, click Open and activate autostart for Winget UI. This allows Winget UI to search, install, and display installed packages. The Software updates section lists available updates, allowing you to update selected packages with a single click. To install new software, click Discover packages, search for the desired program, select it, and click Install selected packages.
2. Effortless System Maintenance
Dism (Deployment Image Servicing and Management) is a crucial Microsoft tool for managing Windows components and installation images. It checks and repairs system files, controlled through various command-line options.
GUI for Dism provides a simple interface for this powerful tool. If system problems are suspected to be caused by damaged files, use the Clean up buttons to clean the WinSxS component store. Click the first two buttons sequentially. The third button cleans up service pack residues, currently unnecessary for Windows 10 or 11.
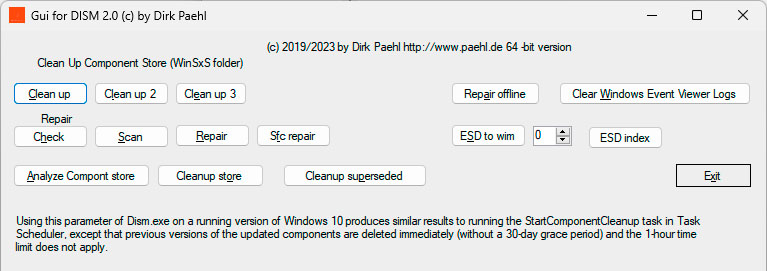 Windows repair: With GUI for Dism you use the Microsoft command line tool Dism to clean up the usually very large Winsxs folder and repair defective system files.
Under Repair, click each button sequentially. Dism examines and repairs damaged system files. Sfc repair initiates the System File Checker (SFC), further enhancing system file integrity.
DISM++ offers similar functionality with a more visually appealing interface. Select Tools > Hard disk cleanup > Reduce WinSxS directory, click Scan, and then Clean up to remove unnecessary files. DISM++ also provides convenient access to various Windows settings under Control Panel.
3. Simplified Image Management with Dism
Dism’s primary function involves managing files in Windows Imaging Format (WIM). While not a daily requirement for average users, professionals utilize this to customize Windows installation images. Dism offers numerous options for handling WIM files, typically involving mounting an image, making changes, applying them, and unmounting.
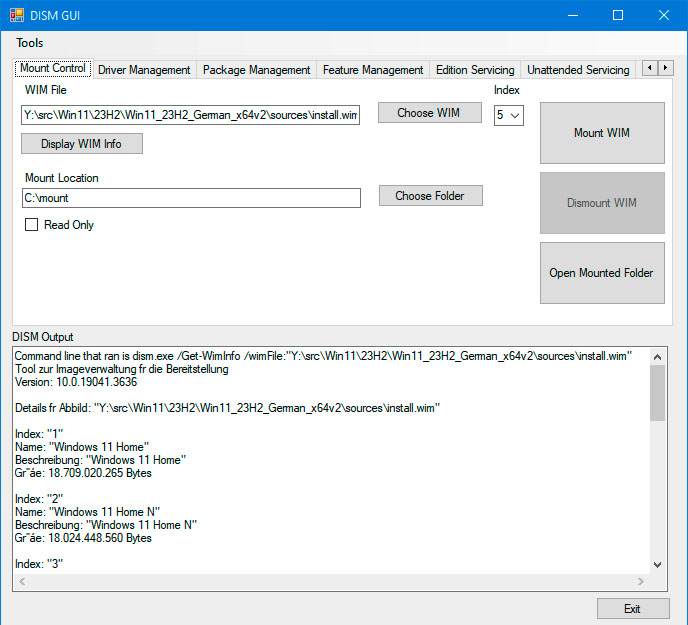 Handling WIM files: Dism-GUI shows which images are contained in a WIM file. The file can be mounted in the file system via the graphical user interface.
Dism GUI simplifies these tasks with a graphical interface. Launch it as administrator, specify the WIM file and mount folder (e.g., C:mount) under Mount Control. Click Display WIM Info to view the file contents. Select the desired edition index from the Install.wim file and click Mount WIM. Other tabs provide functions like integrating drivers and packages.
Dism-Tools offers a more comprehensive approach. Create a new project, specify a name and location, and click Mount Image. Select the WIM file, mount folder (using the default is recommended), and the edition index. Dism-Tools then provides buttons to add packages, drivers, deactivate features, and remove Appx packages.
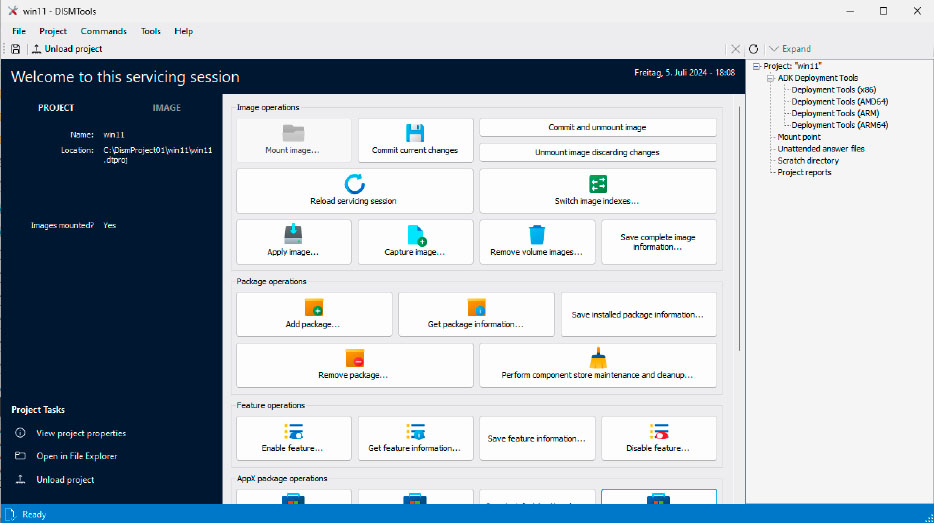 Edit WIM files: DISM-Tools offers a convenient interface that allows you to customize the Windows installation image in a variety of ways. You can remove and add components.
4. A Superior Dism Alternative: Wimlib
While Dism is essential for certain tasks, the open-source Wimlib-Imagex offers a faster alternative for unpacking, repacking, and converting WIM files.
Wimlib-CLC, a graphical frontend for Wimlib-Imagex, provides a user-friendly interface with tabbed options and helpful tooltips. Detailed documentation is available via Help > wimlib documentation (PDF).
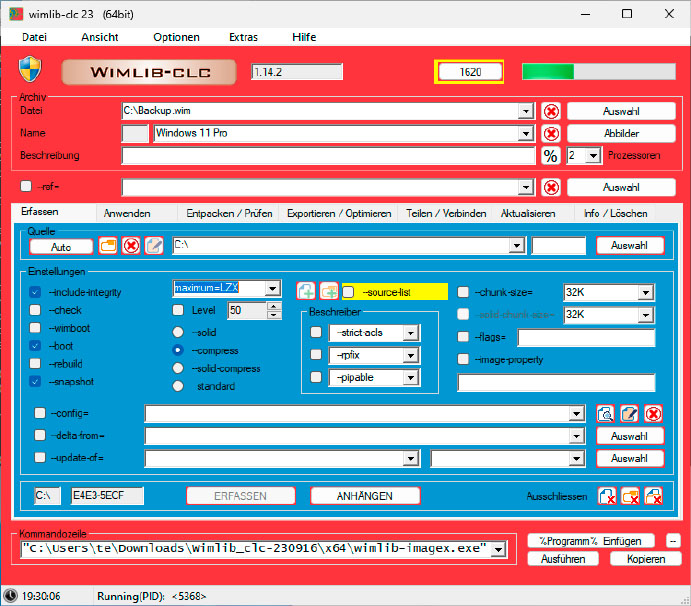 Wimlib instead of Dism: Wimlib-CLC uses Wimlib in the background, which is also suitable for backup tasks. In many cases, it works faster than Microsoft’s Dism.
Wimlib-CLC also functions as a backup tool, a feature absent in Dism during Windows operation. Specify the new WIM file path and the source folder to back up on the Capture tab. Enable snapshot, select compress, set maximum=LZX, and click Execute. To access backed-up files, mount them using Dism GUI or extract them to a new folder using Wimlib-CLC’s Extract/Check tab.
Win NT Setup utilizes Wimlib for portable Windows installations to VHD files or USB drives (Windows-To-Go). It unpacks the Install.wim file, bypassing hardware requirement checks and allowing additional system configuration options, including automated installations with local user accounts.
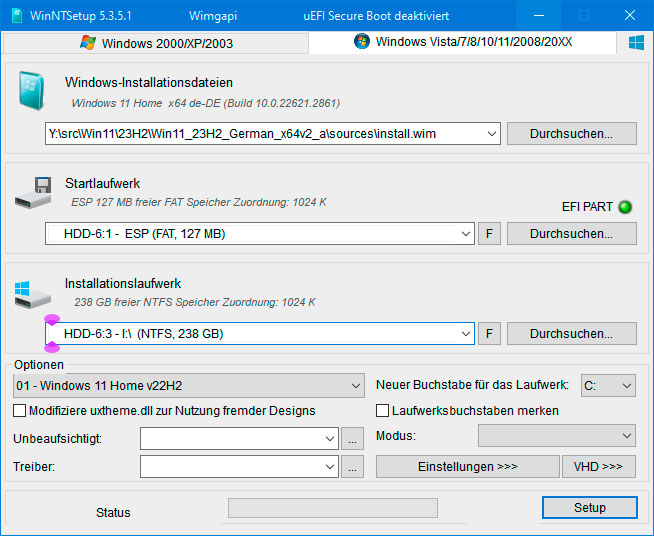 Windows quick installation: Win NT Setup extracts the Windows installation image for Windows-To-Go onto a USB stick or into a VHD file.
ESD File Converter uses Wimlib to convert ESD files to WIM format for further processing. It also unpacks ISO files, applies registry patches, and adds response files for hardware-check-free Windows 11 installations.
5. Managing the Windows Subsystem for Linux
The Windows Subsystem for Linux (WSL) allows running Linux programs on Windows. It’s managed using the wsl command-line tool.
WSL2-Distro-Manager provides a GUI for WSL. Upon first launch, click wsl –install if WSL isn’t already set up, and restart Windows. After login, WSL initializes and installs Ubuntu in a terminal, prompting for a Linux username and password.
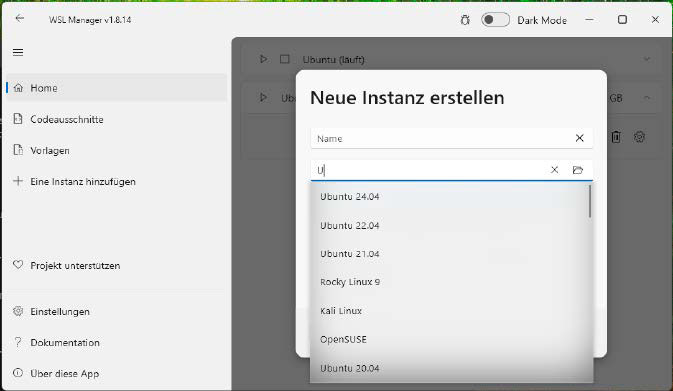 Manage Linux subsystem: WSL2-Distro-Manager gives you access to the WSL configuration and allows you to quickly set up additional Linux distributions.
WSL2-Distro-Manager then displays installed Linux distributions under Home, which can be launched via the Play button. Add new Linux systems using + Add an instance, entering the first letter of the desired distribution and selecting the version. Click Create to install.
6. Simplifying Drive Management
While Disk Management handles most partitioning and formatting tasks, Diskpart is sometimes necessary, particularly for reformatting USB sticks with Linux installation images.
GUI for Diskpart provides a graphical interface for Diskpart. It displays recognized drives and their partitions. Select the target drive, click the … button, and choose Diskpart – Clean. Enable Clean all and confirm, carefully verifying the selected drive.
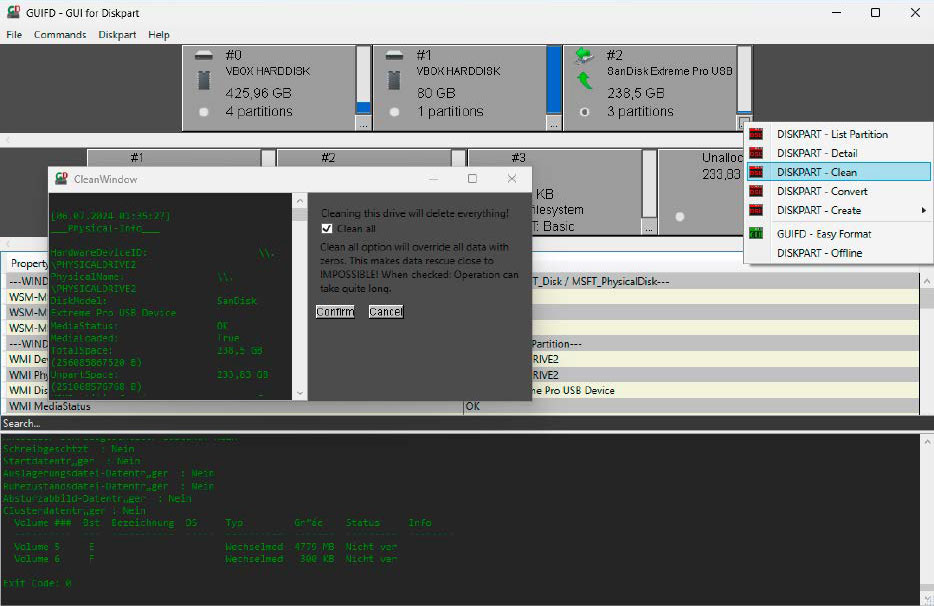 Partition drives: GUI for Diskpart enables convenient use of the command line tool. It can also delete partitions for which Disk Management refuses to work.
Bootice also manages partitions and the boot environment, handling partitions that Disk Management can’t. On the Physical Disk tab, select the drive, click Parts Manage, and then Re-Partitioning. Choose USB-HDD-mode (Single Partition) and the desired file system (NTFS, ExFAT, or FAT32). Bootice formats USB sticks larger than 32GB with FAT32, which Disk Management and Diskpart don’t support. For booting Windows from a USB stick, use USB-HDD-mode (Multi-Partitions), set GUID partition table (GPT), enable the two options below, remove entries after Size, and set the fourth partition to NTFS. Click OK to create the Uefi partitions. Win NT Setup (see section 4) can then install Windows onto this prepared USB stick.
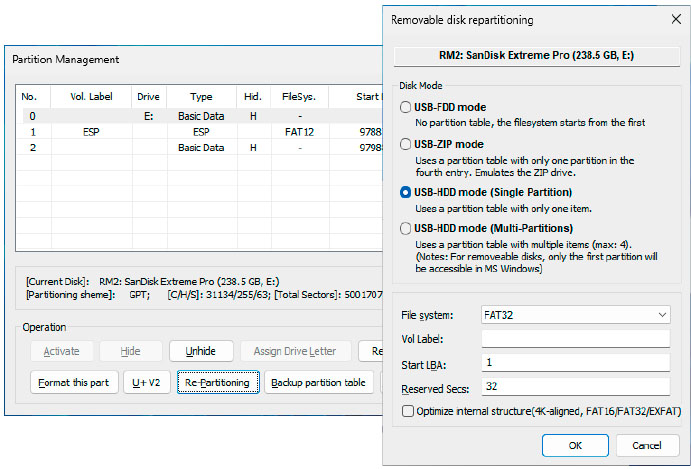 Re-partitioning: Bootice automatically creates a Uefi partition structure on USB sticks. The tool can also format sticks with more than 32 GB with FAT32.
7. Network Speed Testing Made Easy
Iperf, a command-line tool, measures network performance using a client-server model.
Jperf simplifies Iperf usage, displaying results graphically. Requiring a Java runtime environment, launch Jperf via Jperf.bat. On one PC, select Server and click Run Iperf!. On another PC, select Client, enter the server’s IP address, set Output Format to MBytes, and click Run Iperf!. Jperf displays both text output and a graph visualizing the data.
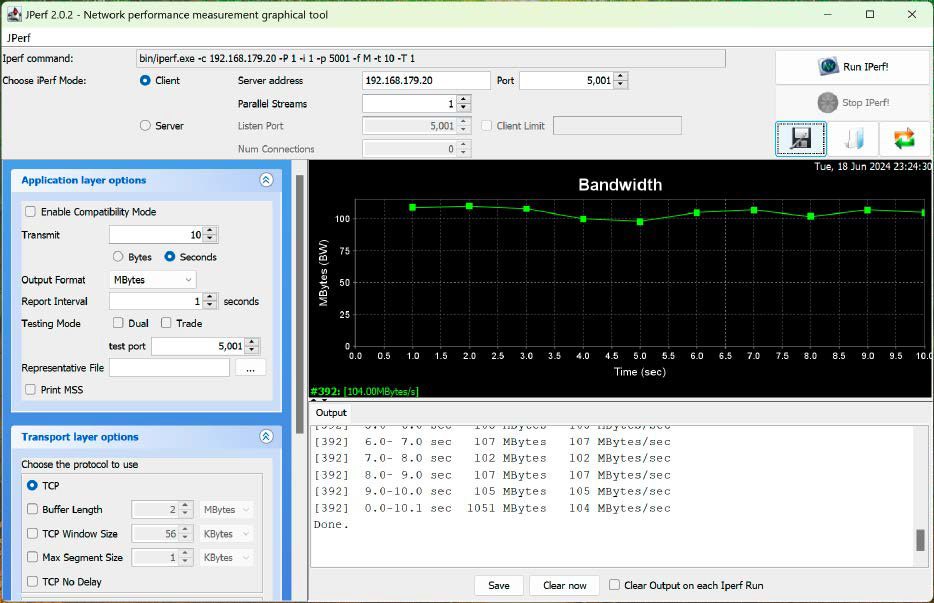 How fast is the network? Jperf reliably determines the transfer rate between two PCs in the network. It can also be used to find out whether the WLAN is delivering the expected performance, for example.
8. Additional GUI Frontends
Several programs offer alternative access to Windows options or serve as frontends for command-line tools.
Wintoys presents system data, CPU, GPU, and RAM utilization in a visually appealing interface. It provides quick access to installed programs, manages autostart apps, and offers performance tweaks and health checks, simplifying access to often buried Windows settings.
Defender UI assists in configuring Windows security settings, allowing customization of recommended security profiles.
Windows 10 Firewall Control Portable analyzes network activities, displaying program internet requests and allowing or denying access, helpful for monitoring potentially unwanted internet activity.
Windows System Control Center (WSCC) downloads, updates, and launches numerous Microsoft (Sysinternals) and Nirsoft tools, including GUI and command-line options, providing descriptions and parameter input for each tool.
PDF Management Simplified
PDFs maintain document formatting across different platforms. However, converting PDFs to HTML or text, extracting pages, or merging/splitting PDFs can be necessary.
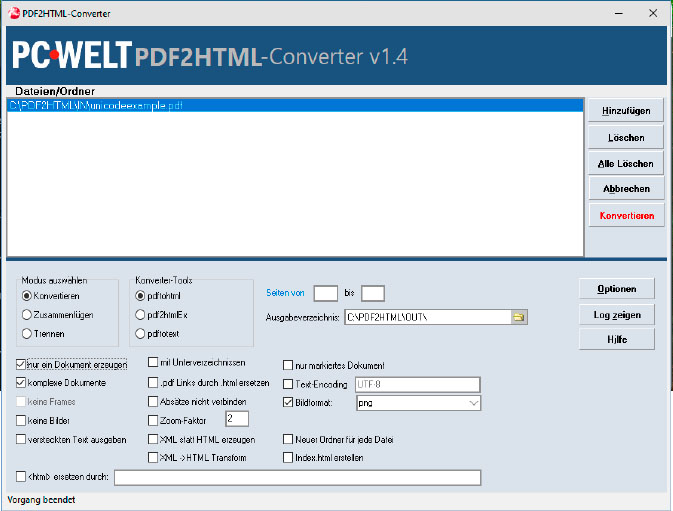 Tool for PDF files: With PDF2HTML you can convert PDFs to HTML or extract the text. PDFs can also be merged or split.
PDF2HTML provides these functions using various command-line tools. Configure an output directory (beware of overwriting files!), add the PDF, and select the desired conversion mode and tool. For layout-accurate HTML, choose Complex documents. pdf2htmlEx generally provides better results, while pdftotext extracts only text. To merge PDFs, select Merge and add multiple files. For splitting, use Separate, specifying page ranges and selecting whether to apply this to all or only selected documents.


